Container Gardening: Carrots

Anyone can grow something somewhere thanks to container gardening. How’s that for an abstract statement about a concrete subject? We can grow something somewhere. How about a pot of lettuce in the kitchen window, a celery stalk cut down and planted in a coffee mug, or carrots in a food storage container?

Carrot Container

Carrot Container

This container is 10 inches tall by eight inches across. I filled it with a 75/25 mix of ProMix and well-finished compost.

Choose a carrot variety that is at least an inch shorter than your container. I’m growing Napoli, a variety that grows up to seven inches long. They do well in containers, raised beds and in the regular garden.

Carrot seeds were planted one inch apart starting one inch from the outside of the container. You don’t need to measure. They’re carrots, they’re not that fussy. Carrot seeds must stay moist while germinating so I covered the container with plastic wrap.
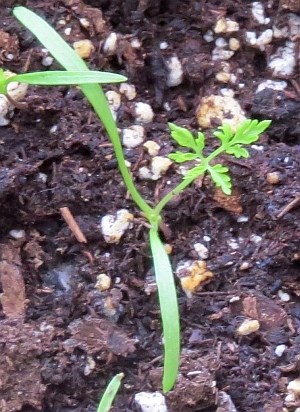
Carrot seedling

Carrot seedling

You shouldn’t have to deal with many weeds when container gardening but just in case, this is a carrot seedling.
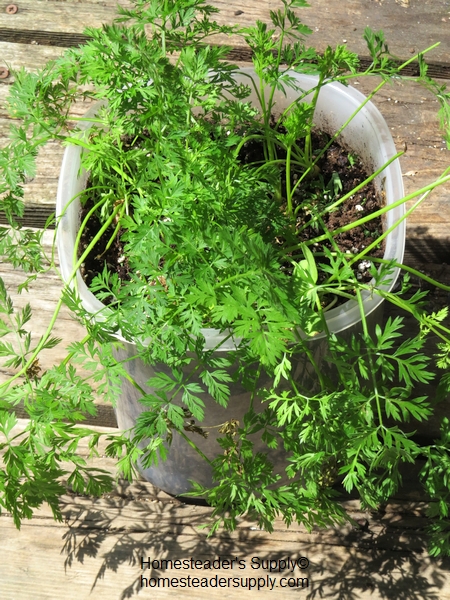
Carrot Container

Carrot Container

I moved the container outdoors as soon as the weather warmed enough during the day, bringing it inside on cold nights. Small containers like this one are easy to move around as necessary. On cold days that kept the container in the house I moved it to follow the sun if I walked by.

Napoli carrots grown in a container

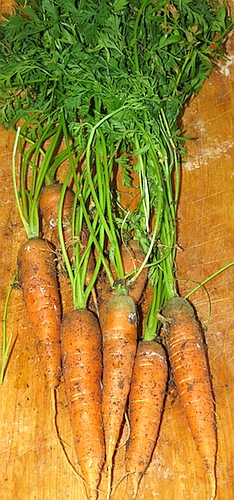
Napoli carrots grown in a container.

Thin the plants as they grow. If you managed to get just one tiny carrot seed per inch you are my carrot-planting hero and I hope you’ll share your seed-spacing tips. I plan to pull every other carrot as they run out of room but it doesn’t always work out that way. Pull the carrots that need to be pulled. They should all be ready to pull within 10 days of each other.

If you’d like to start again you can dump the growing medium out, amend it with compost and replant. I use the same growing medium two or three times for carrots and once for a leafy green before dumping it into the garden and starting again.

Have questions? Leave a comment and we’ll come back to help.


An Important Update for The Ultimate Cheese Press

The Ultimate Cheese Press is our pride and joy. Designed by Jerri Bedell, founder of Homesteader’s Supply and is manufactured by another American company. We’re happy to tell you that we’ve made a change in how our presses are oiled.

We’ve been testing organic non-GMO cold pressed coconut oil and we are very happy with the results. Coconut oil is thicker, soaks into the wood well, and stands up to the acidic nature of whey in cheese making. Presses being shipped now have been treated with coconut oil but If you’d like to order a raw press (not oiled) please request it when you order.

The Ultimate Cheese Press

The Ultimate Cheese Press

Next time you need to treat our press you should follow these steps.

  1. Wash the wood with warm, soapy water. Wash all indentations and where bolts meet wood well.
  2. Air dry for a minimum of four hours, overnight if possible. Be sure the wood is completely dry.
  3. Melt 1/4 cup of organic non-GMO cold pressed coconut oil just until it melts.
  4. Wash your hands to avoid transferring anything to the coconut oil.
  5. Using a lint-free cloth, apply a heavy coat of coconut oil. Place oiled pieces on lint-free cloth or paper towel while the wood absorbs the oil and the oil solidifies. Fold your cloth into small sections that can be pressed into the grooves.
  6. Let the pieces sit for an hour or two before wiping clean with a lint-free cloth.
  7. Inspect all pieces closely. If you’ve missed a spot or the coating of oil is uneven, repeat steps three through five.
Oiling The Ultimate Cheese Press

Oiling The Ultimate Cheese Press

You should hand wash your press with warm (not hot), lightly soapy water after use. Never soak the wood. Be sure to let the pieces dry thoroughly before reassembling the press to store.

The Ultimate Cheese Press

The Ultimate Cheese Press

Motivation Monday – Canning Jars

Motivation Monday

Motivation Monday – a little inspiration to start your week on a good path. Please share your Motivation Monday link in comments. Or share a motivational quote. We’ll visit your blog and leave a comment.

A little inspiration was needed to get the strawberry patch weeded and mulched so I counted the empty canning jars to be sure I have enough for jam. If I don’t get that patch tended to I won’t have enough berries for all I want to put up.

Motivation Monday - Canning Jars

Motivation Monday – Canning Jars

Rain Days

Yeah for rain days! It’s raining today, perfect timing. After a long winter and a hurried spring, it’s nice to have a day indoors. I’m making Chicken Marsala for supper. It’s been a week of simple meals and I’m really looking forward to sitting down with the chicken, fresh asparagus and brown rice.

A few late blooming tart cherry blossoms.

A few late blooming tart cherry blossoms.

The washing machine is getting a workout today. It’s not the best timing but oh when you are a homesteader things sometimes get done when they get done. As much as I love to hang clothes on the line to dry, it’s not happening on this rainy day. I’ll miss sleeping on sheets that were dried in the sun and fresh air and scented by cherry and lilac blossoms, but I’ll fall asleep so fast tonight I won’t miss them for long. Today the dryer is running. Sometimes we compromise in order to get things done and that’s okay.

Also earning its keep today – the dishwasher. I sometimes like to hand wash dishes but this isn’t one of those times. I’ve cleaned out the refrigerator (bonus points for getting this done before science projects sprouted in the back corners), made the chickens happy with their windfall of leftovers, and filled the dish washer. Twice. I love being able to open the door and see what’s in there without squinting or worrying something will fall out and crush my toes.

Clutter gets on my nerves so on this peaceful rainy day, I’m de-cluttering. I am reasonably sure two people do not need eight sandwich containers (we seldom eat sandwiches to begin with). I’ve accumulated a half dozen candles that have only an hour or two worth of wax and wick left so one at a time, I’m burning them. Pine & Balsam in the living room, then Woodland Forest in the kitchen at the other end of the house, and when that was gone I’ll choose another scent. The candle jars will be passed on to a friend who’ll use them to plant succulents. Waste not, want not, yes?

I’m happy to see the rain for the sake of the strawberries. I’m growing Sparkle, a variety with a lot of runners. Some of the parent plants from last year have four or five babies. I’ve dug them up, transplanted them to a new strawberry patch, and have watered them daily. Today’s rain gives me a break from watering and gives the plants a break from the bright sun. They looked terrible yesterday but better today.

Dandelions and puddles

Dandelions and puddles

The apple, pear and cherry blossoms are almost gone. The bees had a nice long spell of good weather and got their job of pollinating done before the rain came. I sit here by the window, looking out at a young apple tree with a few straggling blossoms left, and think ahead to the apples I’ll be using for sauce and pies, leaving some behind for the white-tail deer.

Choke cherry blossoms

Choke cherry blossoms weighed down by the rain

I’ll make cherry jelly with the tart cherries if I can pick them before the robins and blue jays discover them. The choke cherries are left for the birds, and sometimes the bears, a bit more tart than we like.

Peaceful, lazy rainy days sure are busy. They’re a welcome change of pace at the end of a busy week and before the start of a sunny, hot weekend.

What do you do on rainy days?

Sourdough bread

A quick and easy sourdough bread recipe

Sourdough bread isn’t supposed to be quick. The starter should ferment until its full flavor develops. The bread should rise slowly in a cool room to allow more flavor to develop. Those air pockets created by the yeast, the ones that hold globs of your butter or olive oil or jam, need time to grow. It’s all very lovely and tasty when you have time to wait, but that’s not how my day is going.

It was 2 pm before I realized we’re out of bread. Normally I mix up my starter, the water, some organic whole wheat flour and unbleached bread flour around 4 pm. I mix and knead by hand, feeling the dough as it changes, knowing exactly when to stop kneading. Then it sits in the bread pan I’ll bake it in, on the counter by the cool outer wall of the kitchen to rise overnight. First thing next morning, around 4:30, I pop the bread into a 400* oven, but that’s not how my day is going.

Pickle-Pro sourdough starter

Pickle-Pro sourdough starter

Today I’m making quick and simple sourdough bread so that I can have it with dinner. My starter is kept in a pint canning jar with a Pickle-Pro lid. It’s been the best starter I’ve used. The airlock has kept alcohol from building up on the surface of the starter if I don’t use it fairly quickly.

Sourdough Bread Recipe

Oven: 400*  Bake for 30-40 minutes

1 cup sourdough starter
1 cup warm water, around 100*
1 1/2 cups organic whole wheat flour
Approximately 3 1/2 cups bread or all-purpose flour
2 tsp yeast

I used the mixer today so I could let the mixer do the kneading and unload the dish washer. Use the kneading hook. Add sourdough starter, warm water and yeast to bowl. Turn mixer on and add the whole wheat flour in 1/2 cup increments. Add bread or all-purpose flour in one half cup increments. For the last cup of flour, allow the mixer to knead for a minute. Turn off the mixer and touch the dough. It should be moist but not sticky. The dough should pull away from the sides and be wrapped around the hook. If the dough is sticky add 1/4 cup of flour, knead and check. Experienced bread makers will “just add it” and know when they’ve reached the right look and texture.

Oil two bread pans with olive oil or butter if necessary. Today I need bread for sandwiches so I’m not looking for a loaf with a big rounded top. I like a wide loaf with a flat top so that a slice holds a nice amount of sandwich filling with one slice of bread. Remove the dough from the mixer and set aside to rise until it has doubled in size. Gently slice the dough in two and shape into two loaves. I don’t knead, just separate and shape. Allow to rise the second time. It’s ready for the oven when you gently press on the firm dough and it recovers slowly.

Make a slice down the center of the loaf (two slices if you’re making a round loaf) and spritz it with water. The slice and the water allow the dough to rise easily, forming nice pockets. If the crust starts to dry out, spritz it again.

It’s conveniently chilly and damp today so the wood stove is going this afternoon. I’m breaking my slow rise rule and put my bread on the clothes rack in the warm living room to rise quickly.

Sourdough rising

Sourdough rising. This is almost high enough for the size loaf I’m after.

Sourdough bread bakedWhile the dough is rising I mixed up another batch of starter. I use the same jar or scrape the last tablespoon or two of starter from it and add it to a new jar. The only time I don’t have starter in the jar is on the original batch. Notice how much lighter in color this new batch is compared to the one above. As it ages and develops it becomes darker. This jar sits in a cool spot in the kitchen. I don’t tend to it daily. Tomorrow morning it will be at the top of jar. I’ll stir it down if necessary but otherwise it’s on its own until I use it in a day or two.

Sourdough bread