The Homestead To Do List

The Homestead To Do List

It’s overwhelming sometimes, isn’t? Seems like the Homestead To Do list grows as fast as the weeds, is as hard to whittle down as it is to muck stalls in spring, and that it has a mind of its own. Leave it sitting on the table unsupervised and someone’s apt to add to it while you’re not looking.

These tips might help you keep the list from taking over every waking moment.

Separate your lists. One list for the homestead work, one for household work, one for kids. But keep control of how many lists you have. Combine what goes together naturally.

Homestead tasks include the garden, putting food up, firewood, livestock, poultry and similar tasks. Household tasks include laundry, dishes, floors, dusting, painting and decorating.

Homesteading To Do List

Control your lists, don’t let your lists control you.

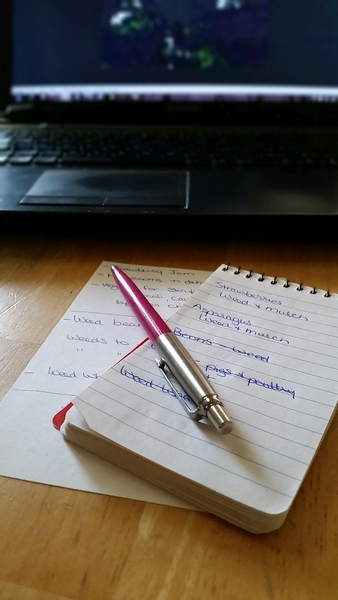
A daily list is a big help to me. I end my day but writing tomorrow’s To Do list on a 3″ x 5″ spiral bound notebook that fits in my back pocket. I have tiny pens that fit in my pocket, too. A fresh list, in the order I should work, keeps me focused. I don’t have to clutter my mind trying to remember what else I need to do, and that helps me concentrate on the task at hand. Anything I didn’t accomplish today goes to tomorrow’s list if it still really needs to be done.

Here’s one for your to do list. Subscribe to Homesteader’s Supply newsletter.

The pen is a big time saver. Write down your additions. Again, if you’re not working to remember everything you’re better able to concentrate.

Be Seasonal. If you’re not going to get to certain tasks until winter don’t clutter your list with them now. I makes your list look and feel longer than it is. Make a note on a master list and forget about it for now.

Accept that your lists will probably never be empty. That’s a hard one. It’s a relief to cross items off the list. It must be a great feeling to not have a To Do list. I’m not familiar with that feeling. Lists evolve. They grow, shrink, change, get crumpled up and thrown away.

Set Time Limits. Set time limits. Be realistic, but aim to get the job done in a certain amount of time. It takes me one hour to weed the beans if I hustle. Keep moving and work efficiently.

Weather. Pay attention to the weather. I can weed the beans today before it gets too hot but I can’t put them on tomorrow’s list because it’s going to rain hard all day.

Do a good job. Doing a good job today means some items won’t be back on your list too soon. It’s worth the extra time and effort now even when it feels like a big burden during an especially busy time of year.

Be Realistic. I had beautiful perennial gardens on my list year after year after year. Weed. Plant. Weed. Prune. Weed. I’ve come to the conclusion that there isn’t time to raise pigs and poultry, have a half-acre garden, put up all this food, cut, split and stack the firewood, and have beautiful perennial gardens.

Control your to do list, don’t let your to do list control you.

Garlic Scapes – You do what with them?

Mary asked about picking and prepping garlic scapes in our last blog. “I’m sure. I’d love a few pointers regarding picking (how low down do you pick them?) and prepping (the flower bud goes in the trash, correct?)”

How to Pick Garlic Scapes

Don’t pick this much of the plant. I picked this to get a better picture.

A scape is garlic’s flower stem. On this stem, the flower is still developing and is closed. The scape is young and pliable. You might be able to pull the scape from the plant but usually you’ll need to snap it off. Snap or pull it from just above the last frond. If you pick early enough the entire stem is soft. If the bottom is woody you’ll need to cut it off and use only the pliable portion.

Pick garlic scape here

Pick garlic scape here

If I’ve picked them early enough the flower bud is tiny and I use it in my pesto and pickled scapes. If they’re larger, like the one in this photo, I use one or two for looks. They are edible but a bit more fibrous. This jar went into the fridge to be eaten first because it doesn’t have a cover that seals.

Garlic Scape Pesto

10-20 garlic scapes, depending on size
1/3 cup nuts (walnut, pistachio, pine nut, almonds; may also use sunflower seeds)
1/3 cup Parmesan cheese
1/3 cup olive oil

Remove flower buds from scapes. Chop scapes into one to two inch pieces that won’t get pushed to the outer edge of the blender or food processor.

Process scapes and nuts or sunflower seeds until smooth, adding olive oil as you go. Stir in Parmesan cheese by hand.

Garlic scape pesto is excellent on Bruscetta, pasta, crackers and even as a spread in your sandwich. Want to spice up your spaghetti sauce? Add some pesto, either garlic scape or basil. If you have leftover basil and garlic scape pestoes you can mix them together. It doesn’t matter whether the nuts match, it will be tasty.

Pickled Garlic Scapes

Pickled garlic scapes! Delicious but not well known. Scapes are the flower stems of garlic. Whether you should leave them on the plant or cut them is up to the grower. We like to pickle them. If you love garlic you’ll most likely love scapes, too.  They are garlic’s bonus.

Garlic Scapes

Garlic Scapes

Pick scapes while they are young. I wait until they start to curl so that I have more scape to eat, and pick before the lower portion of the stem starts to get woody and tough. I put my canning jars in the dishwasher and go out to pick scapes. The jars will still be hot when I’m ready for them.

Coil the scapes to make putting them in jars easier. This works well for small mouth jars. Fill the jars to one-half inch from the top.

Pickled Garlic Scape Recipe

For four to five pints mix:

3 cups Apple Cider vinegar
3 cups water
4 tablespoons raw sugar
4 tablespoons salt

Mix well and bring to a boil. While you’re waiting for the boil add two to three teaspoons of pickling spice to each pint jar.

Garlic scapes and pickling spices

Garlic scapes and pickling spices

Pour boiling liquid over scapes, filling jar to one-half inch from the top. Wiggle the jars to remove all air bubbles. Apply lid and screw on ring until it’s finger tight. Finger tight means snug but not so tight that air can’t escape.

Pickled Garlic Scapes

Pickled Garlic Scapes

Boiling Water Bath

Place a rack in the canner and fill canner with hot water (around 180 degrees) high enough to cover the jars with one inch of water. Bring the water to a full rolling boil, cover the canner and reduce heat to bring the boil down to a light but steady boil for ten minutes. Remove jars from water and place them on a cooling rack out of the breeze. Listen for pops. Each pop indicates a jar has sealed. Re-process jars that don’t seal or place them in the refrigerator and eat them first.

Waiting approximately six weeks to open the first jar makes for the best pickled scapes but that’s not easy to do. I open the first one after a month. They’re not quite there yet but they’re definitely delicious enough to enjoy!

Ultimate Cheese Press Instructional Video

The Ultimate Cheese Press and More!

Wardee from GNOWFGLINS shows us how to use The Ultimate Cheese Press step by step. It’s very simple and seeing it in action lets us know we’re doing it just right.

You’ll find supplies you need to make cheese on our website. Calcium chloride and lipase are hereCheesecloth and muslin.  We have a great variety of cultures.

Do you need drying racks, funnels and other cheese making tools? We have two cheese making books. And kits. We have great cheese making kits.

And there’s more! You’ll find more cheese making supplies here.

Cheese Recipes

Bay, basil, sage, roasted bell pepper and olive oil makes a delicious marinade.

Bay, basil, sage, roasted bell pepper and olive oil makes a delicious marinade.

Farmer's Cheese with Garlic & Chive seasoning. Ultimate Cheese Press can be used to form a wheel.

Farmer’s Cheese with Garlic Chive seasoning

We’re proud of our American made products. Made in the USA, they keep our dollars in not just our country but in our communities.

Sale! We’re Having an Independence Day Sale!

Let’s celebrate Independence Day with a sale worthy of fireworks!

We’re proud of our American made products. Made in the USA, they keep our dollars in not just our country but in our communities. That’s cause for celebration!

We’ll start our sale with a store-wide $10 coupon on purchases over $99. Enter code USA4th in the box at checkout. The code is good starting today through Sunday, July 6th, 2014.

The following items are marked at their sale price on the website and the prices are set until the end of July.

One Sale! The Ultimate Cheese Press

The Ultimate Cheese Press

The Ultimate Cheese Press is made for home cheese makers, designed and manufactured by the owner of Homesteaders Supply right here in the USA!  Made from a beautiful grained hard maple, with a lighter basic color with various shades of darker marbling. Each press is as unique as the wood its made from.  $165, the lowest price we’ve been able to offer in a long time.

Our new video by Wardeh Harmon, founder of GNOWFGLINS, is in and features a press treated with organic coconut oil.

Italian Mozzarella Cheesemaking Kit

On Sale! Italian Mozzarella Cheesemaking Kit

Italian Mozzarella Cheesemaking Kit

This Italian Mozzarella Cheesemaking kit is for making real Italian Mozzarella and is exclusively from Homesteader’s Supply!  Most mozzarella recipes call for using citric acid, vinegar or lemon.. making your cheese in about 30 minutes, an easy way to get what you want fast.  But, if you would like to try an old fashioned way to make the best mozzarella you have ever tasted, try our kit where the recipe uses a special Italian culture instead of citric acid, that adds a very unique old-world flavor to this cheese. And of course, the extra time involved making this cheese also enhances the great flavor.  $53.50

Squeezo Strainer and Sauce Maker – Delux

On Sale! Squeezo Strainer and Sauce Maker - Delux

Squeezo Strainer and Sauce Maker – Delux

Free Shipping on the Squeezo Strainer and Sauce Maker – Delux

Making homemade tomato sauce, applesauce and preserves is no longer a chore when you use the All Metal Squeezo Strainer and Sauce Maker, now with Stainless Steel Screens! The Squeezo Strainer made by Best Products today is the same as the old Garden Way Squeezo Strainer later made by Lemra Products. Made the same as it was 25-30 years ago and still made in the USA.

Cherry Pitter Deluxe

On Sale! Cherry Pitter Delux

Cherry Pitter Delux

Delux Cherry Pitter. Made in the USA! Now on sale at $199.00 AND we give you free shipping!

New and improved Cherry Pitter that will easily remove the pits of five cherries at a time, even the largest diameter cherries. It is USA Made and is all stainless steel. The design easily removes the pits without losing the cherries’ juice. With a quick pull of the handle the stones are discarded and the cherries drop into a container below.

Stainless Steel Milking Pail with Chime

On Sale! Stainless Steel Milking Pail with Chime

Stainless Steel Milking Pail with Chime

Stainless Steel Milking Pail with Chime – 13 QT.  Made in the USA!  This is the best pail!  Made in USA. It’s seamless and has no welds! Our sale price is $84.50, a savings of 14%!

Top Outside Diameter: 12-1/4″, Height: 9-1/2″, Bottom Diameter: 8-3/8″, Pail Thickness: Bottom and top rim are .105 (12 gauge) and sides are drawn (flowformed) to between .012 and .015 (28 to 30 gauge).

Porta Milker Milking Machine

On Sale! Porta Milker Milking Machine

Porta Milker Milking Machine

We need to talk!  Give us a call to receive $100 off the Porta Milker Milking Machine. (928) 583-0254

Complete set up:  2 Wheel Porta-Milker Base Unit with Electric Motor, 65# Stainless Steel Bucket & Lid Assembly, and Milking Cluster Assembly to milk One Cow!

We give you personalized service, with added instructions for cleaning the natural, organic way, and we are available to help you with any questions you have about the set up and use of our product.  We don’t just say that we give you good customer service…we actually do it!

Homemade Summer Drinks From Your Kitchen

Homemade Summer Drinks

Homemade Summer Drinks

Homemade Summer Drinks

Ahhh summer! It’s time for delicious homemade summer drinks that quench your thirst, taste great and are healthy. These recipes are child friendly. They can be turned into an adult beverage with the addition of your choice of alcohol. We know a lot of fruit and sweetener can be out of the question for many diabetics so we have a smoothie recipe that’s suitable for most everyone.

Garnishes are easy ways to make homemade summer drinks prettier and might add some flavor. Edible flowers such as chive blossoms, violets and rose petals are perfect. Be sure they haven’t been sprayed with pesticide. Sprigs of mint are great, and an established plant will continue to grow and provide more sprigs.

It’s easy to substitute fresh fruit in your summer beverages as they come into season. Strawberries, raspberries, blackberries, blueberries, gooseberries, plums, watermelon, cantaloupe, peaches, grapes, apricots…the list is long.

Freezing fruit to use in place of ice cubes will keep your beverage from being watered down as the fruit thaws. Pureeing fruit before freezing is a nice treat. As it melts you’ll be able to drink the fruit through a straw so you don’t lose it beneath the ice.

Coconut Peach Lemonade

  • 1 tablespoon honey or agave
  • 2 cups of coconut water
  • 2 peaches, peeled and pit removed
  • Juice from five lemons
  • ice
  • garnish – peach slice, spring of mint or a slice of lemon is nice

Put everything but the garnish in the blender. Blend on high until you reach the consistency of a Smoothie. Pour into a tall glass. Garnish and serve with a tall straw.

Freeze strawberries for "ice" cubes that won't water down your beverage.

Freeze strawberries for “ice” cubes that won’t water down your beverage.

Strawberry Watermelon Lemonade

It’s hard to beat sweet, juicy watermelon and strawberries on a hot summer day.

  • 3 cups of watermelon, seeds removed
  • 1 1/2 cups sliced strawberries. Slice one cup, leave 1/2 cup whole.
  • 1/4 cup agave or honey
  • 1/2 cup lemon juice
  • 4 cups sparkling water

Combine watermelon, 1 cup strawberries, agave or honey, and lemon juice in the blender. Blend until smooth, approximately 30 seconds. Stir in sparkling water and pour into glasses. Garnish with a strawberry.

Peach Smoothie

  • 1/2 cup sugar free yogurt, peach or vanilla flavor
  • 1 peach, peeled and chopped
  • 1/2 cup skim milk
  • 1/4 tsp cinnamon
  • 1 cup ice

Combine all ingredients in the blender and blend until smooth.