Category Archives: Straw Bale Gardening

3 Things to Consider When Planning Your Fall Garden

A fall garden has a lot of advantages. Perhaps best of all is that the cooler weather lets you plant your favorite early spring crops again, so you can enjoy them twice in the same year! You don’t need to contend with as many bugs, either. It’s more comfortable to be outdoors, for both you and your plants. Veggies won’t bolt quickly the way do in the intense heat of summer. Some folks even say the frost brings out more flavor in certain crops.  And then, depending on where you live, the harvest season can extend until quite late in the year.

If you’ve never planted a fall garden before, here are three things to consider before you start. Continue reading

Straw Bale Gardening – Photo blog

I notice that this time of year folks start thinking about the garden… I notice the hits on the previous straw bale gardening articles goes way up and also noticed that they are a little short on photographs of the process. In this blog I will document in words and photos the garden from 2010 where I planted in bales of straw.

I went up to the feed store and picked out 20 straw bales. I arranged them in the pattern you see below. Knowing now what I didn’t know then… I’d lay them down on their side instead of standing them up like I did. They become a bit top heavy with plants growing up and holding fruits.


Next, I began the composting process. The recipe I found online called for one cup of 30-0-0 Ammonium Phosphate per bale on day one and 1/4 cup of the same fertilizer each day for 9 more days, followed by a good soaking with the hose. I could NOT find Ammonium Phosphate at any garden store so I settled for Sodium Phosphate (21-0-0) and it did the job just fine. Notice how much darker the sides of the bales are after 10 days of cooking. The insides of the bales have broken down a bit and are soggy and warm.

I took a few of the bales and cut out V grooves in there or dirt and plants… this was completely unnecessary and just bound up my chainsaw… Using a claw gardening tool made a big enough hole for the plant and some added growing material (compost). Again, the pulling out of straw below isn’t needed, just a coffee can size hole where your plant will live or sprinkle seeds on top of the bale and cover with dirt and straw works fine too.


Below is where I added soil to the V shapes I cut out. After I planted in the bale, I covered with some of the loose straw and soaked well..

Now it’s finally taking form!!! See the happy pepper plants spreading out their roots in their new home!

As you’ll see in the photos below it was a very successful adventure. As I said above, if I do this again, I’d turn the bales on the side for added stability. You can see below that some of the bales aren’t doing so well with top heavy plants. The cucumbers were alone the fence in the back for climbing. Peas and green beans didn’t do well in this growing medium… they are nitrogen fixers and in an already nitrogen rich environment, I didn’t enjoy very many peas. Lettuce, cucumber, tomitillo, cilantro, carrots, tomatoes, peppers all did very well.


I hope you find this helpful in your decision on growing in straw bales. It does save the back… but I will admit to growing in the ground the following year… I had to do something with all that composted straw so I pulled all of the twine and tilled it right into the Arizona clay…

Happy Homesteading!!!!

Nance

Prepping the garden in the early winter

Winter’s chill is upon us. Arizona had the first hard freeze the week. The tomato plants that were lush and green last week are now wilted, the leaves curled into themselves burnt from the hard freeze. Half grown green tomatoes fill the vines. The greens of the sweet onions are also wilted and drooping. The freeze has killed off the last of the summer’s growth and now it’s time to prep the garden for next year.

I have livestock. A Jersey dairy cow and her calf and an old quarter horse who’s retirement is to hang with the cows. I also have a small flock of chickens and a breeding pair of emu. The pens and pasture are raked weekly and the compost pile has been cooking all summer. Now that the garden has been hit by the freeze, it’s time to pull up the dead plants, seek out the few onions that remain in the dirt and prep it for winter. And in prepping for winter, for me I mean prepping for next spring. I’ll move the compost pile that has been cooking all summer over the garden beds and that have lost dirt to digging chickens, dust storms and the great Arizona winds. I’m hoping to double the depth of the beds this year because some of my plants struggled with root depth and the hard Arizona clay at the bottom of the beds.

Come December, it will be garlic planting time. If I can get the compost moved and keep it watered on the warmer days it should be ready to host garlic in a couple of months. I plan to create an herb section this coming spring, eager for fresh basil and rosemary to cook with.

How do you prep your garden for winter? Do any of you grow garlic? Eager for comments and good conversation!

Gardening With Straw Bales

Something to keep in mind when considering gardening with straw bales, make sure you purchase straw and not hay bales… hay will get too hot in the composting process and will kill your plants.

You can plant either seeds or plants in straw bales. I sowed seeds and transplanted from four inch pots last year, but before you begin, you must begin the composting process. I arranged the dry bales (much easier to move when dry!) in the configuration that worked for our back yard. You can either lay them down on the side (strings on the top and bottom) or strings on the sides with the cut straw facing top and bottom. If strings are on the sides, like in the photos, they tend to be a bit wobbly so secure them to each other or stake them into the ground with rebar. I neglected to do this and had a few bales fall over. Once the bales are arranged properly for your space, soak them thoroughly and sprinkle each bale with one cup of either ammonium sulfate or ammonium nitrate (though the latter is difficult to find since it’s been used for terrorism). Soak the bales again and let rest for one day. On day two, sprinkle one quarter cup of the fertilizer on each bale and soak thoroughly again. Repeat for eight more days. On day eleven, stop using the fertilizer and just soak the bales well for another ten days. On day twenty one from setup, you’re ready to test and see if the bales have cooked enough.

Now that the cooking process is complete, push your hand down into the bales and see if
Is it HOT inside the bale? Warm is ok, hot means it’s still cooking and you should wait a few days before planting. Just continue to water each day and test again.

Does it give enough (meaning is the straw still tight or has it composted enough) for you to get your hand inside the bale?

If the bale is no longer hot and if there is give for your hand… then you’re ready to plant!

What I do for seeds is work a couple of coffee cans of soil into the top of the bales and then poke the seeds into the soil based on planting depth. Once the seeds are in place you can lightly sprinkle soil on top of them and water carefully until they sprout. You can cover it with mulch if the spring temps are super high, but typically, as long as I keep it watered a few times a day to keep the seeds moist, they will sprout within a week. If you water too hard (high water pressure) your seeds will sprout from the ground around the bale, so be careful to soak the bales slowly as not to wash away your seeds.

Now for the transplants, I use a pointed shovel and stick it into the bale and then pry it back creating a gap in the bale, I pour in soil from the coffee can and water so the soil is moist or even muddy. I remove the shovel once there is enough soil to keep the gap open. I then make a hold for the plant and add a bit of soil on top to make sure the roots are well covered. Again, mulch is optional depending on the weather. Water the bales twice daily if there isn’t rain and add compost tea if they look faded at all. I have used miracle grow with great results but some look for an organic option and composting teas are wonderful and nutrient rich.

Happy Gardening!

Phase 1 of Straw Bale Gardening….

After much research, I am about to embark on gardening IN straw bales. One important step I’ve come to learn is that it’s best NOT to take shortcuts. Several people shared failure tales… simply soaking their bales with water for a few days before planting offered little nutrients to their plants and thus… little if nothing to harvest… they didn’t take the time to create a growing environment within the bale by adding the Ammonium Nitrate or compost teas to the bales for 10 days before planting.

To be perfectly honest, I won’t be adding Ammonium Nitrate either… I can’t find the stuff! So, instead of using the 30-0-0 power of Ammonium Nitrate… I’ll be using the 21-0-0 power of Ammonium Sulfate. I’m hoping it will produce the same result, which is to begin to ‘cook’ or ‘compost’ the bale. This allows the bale to ‘cook’ – or increase the temperature of the bale as it begins the process of decomposing. We definitely don’t want this process to begin once our plants are rooting in the bale. Temperatures during this process can hit 165 degrees and will damage, if not kill, your young little starters. I’ll be taking pictures this weekend as I lay out the garden of bales, sprinkle on the 1st cup of fertilizer and then soak with water. From what I’ve read, the first day we will sprinkle 1 cup of Ammonium Sulfate onto each bale… the next 9 days call for 1/4 cup each day before soaking. I also plan on taking beginning temperatures and keeping a log for the entire 10 days to see what kind of temperatures we obtain using the Sulfate as opposed to the Nitrate.

Stay tuned for more updates on the new garden!

Planting in Straw Bales

A few years ago I had about 40 straw bales hanging around from a straw bale wall project that never did happen. I decided to build a series of raised beds with them for my garden. I set up beds that were 4 bales long and 1 bale wide – then filled the rectangle with compost that my cows and chickens had shared through out the previous year. I had the best crops out of any garden that year!!! I was going to do a similar set up this year until I did some research on straw bale raised beds and found many homesteaders actually growing their veggies in the bales themselves rather than using the bales to hold the dirt in place!

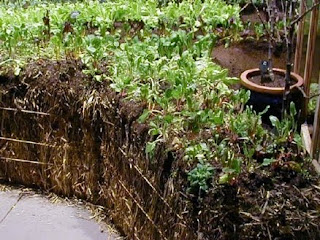
A blog called the Gardner’s Rake has a great article on how to prep the bales to become a growing medium for wonderful crops! The picture to the right I found on Google to see how plants looked growing from straw bales. Apparently, by soaking the bales, adding a compost tea (which I’ll share the steps for when I do it) and then cutting a small planting hole in the bale to add small amounts of soil for a growing medium… add the plant and get ready to harvest!!!

I’ll take pictures and post as I progress, sharing with you the success and failures in the project!

Thanks for reading,

Nance with Homesteader’s Supply!