Monthly Archives: September 2015

Guest Post: Things Are Sprouting Up

This week, we have a special guest post from our friend Ida Walker of The Enabling Cook. Ida recently tried out our Speedy Sprouts, and here’s what she had to say:

Things Are Sprouting Up

I’ve blogged about growing sprouts before, especially wheat and rye berries. I’ve wanted to sprout barley for bread for a long time, but I’ve not been able to find grains that will sprout. And I’ve also blogged about the great service and products I’ve gotten from Homesteader’s Supply. This post combines both.

A while ago, Homesteader’s Supply’s Jerri told me they were now offering a line of sprouting seeds called Speedy Sprouts. She asked if I’d like to test drive some, so to speak. I jumped at the opportunity to do so, and she sent me some barley seeds and wheat berries.

I had some questions before starting “Bob Barley,” of course. These are organic, non-GMO and high-germinating seeds. Good to know. Then she told me they were hulled, which immediately sent up “Danger, Will Robinson,” signals. (Okay, “danger” is probably too strong a word, but I wanted to use the Will Robinson quote. I have no shame.) As I researched barley, one of the most common admonitions I found was that hulled barley will not sprout; it’s too damaged in the process of removing the hulls. Hulless barley will sprout, but sprouting rates are not as good as when you use barley with its hull intact. I asked Jerri about these seeds, and she confirmed they sprouted.

I confess I was really confused. I looked at the seeds, and they certainly looked like the hulls were intact. So why did the grower/supplier say they were hulled?

hulled
I did more research and was schooled in word choice. Some refer to hull-intact barley as being hulled. This doesn’t make total sense to me. After all, we don’t call oranges peeled if they still have their peels. Oh well. My advice? If you are contemplating ordering or buying barley seeds from anywhere, ask if they will sprout. If possible, read reviews and find out the sprouting experiences of others.

Anyway, back to the matter at hand. These seeds do sprout. And they were quick about it. Granted, it was warmer in here than when I usually sprout; it was probably in the low 70s. Still, their sprouts started to show in about a day and a half. They were ready to dehydrate and grind in three!

sprouted

Some are a little longer than I usually allow, but they were fine. Of all the seeds I started sprouting, all of them sprouted!

I only use these for flour, so I can’t say how they’d be for eating out of hand. But if you’re looking for sprouting barley for bread, these are a good choice. Check out these and other sprouting seeds and supplies available through Homesteaders’ Supply.

© Copyright 2015 Ida Walker, All rights Reserved. Written For: The Enabling Cook


How to Buy the Best Produce without Blowing Your Budget

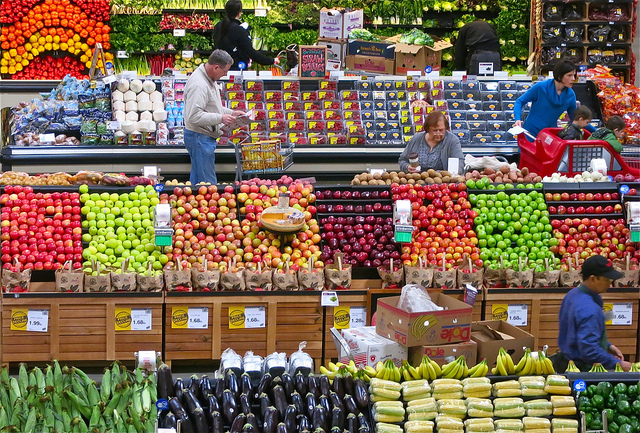
Unless you’re a hard core proponent of the local food movement and never eat anything that was grown outside your immediate area, you’ll find yourself cruising the produce aisle at the supermarket from time to time, especially now that gardening season is winding down. If you grow your own food, you will probably be looking for products that were produced using sustainable and organic practices.

14961829054_25677820ef_z

Unfortunately, depending on the time of year and where you live, the selection of organic fruits and vegetables can sometimes be downright pitiful or prohibitively expensive. What do you do when you can’t find what you’re looking for, or when the item you want costs more than you can afford to pay?

Do you know how to choose the highest quality foods from the available selection? Or do you get frustrated, grab just “whatever,” and then pray it doesn’t harm your health?

If you’re discerning about the quality of the fruits and vegetables your family eats, you need to become a savvy produce shopper.

Navigating Supermarket Produce Aisles

organic_apple_label

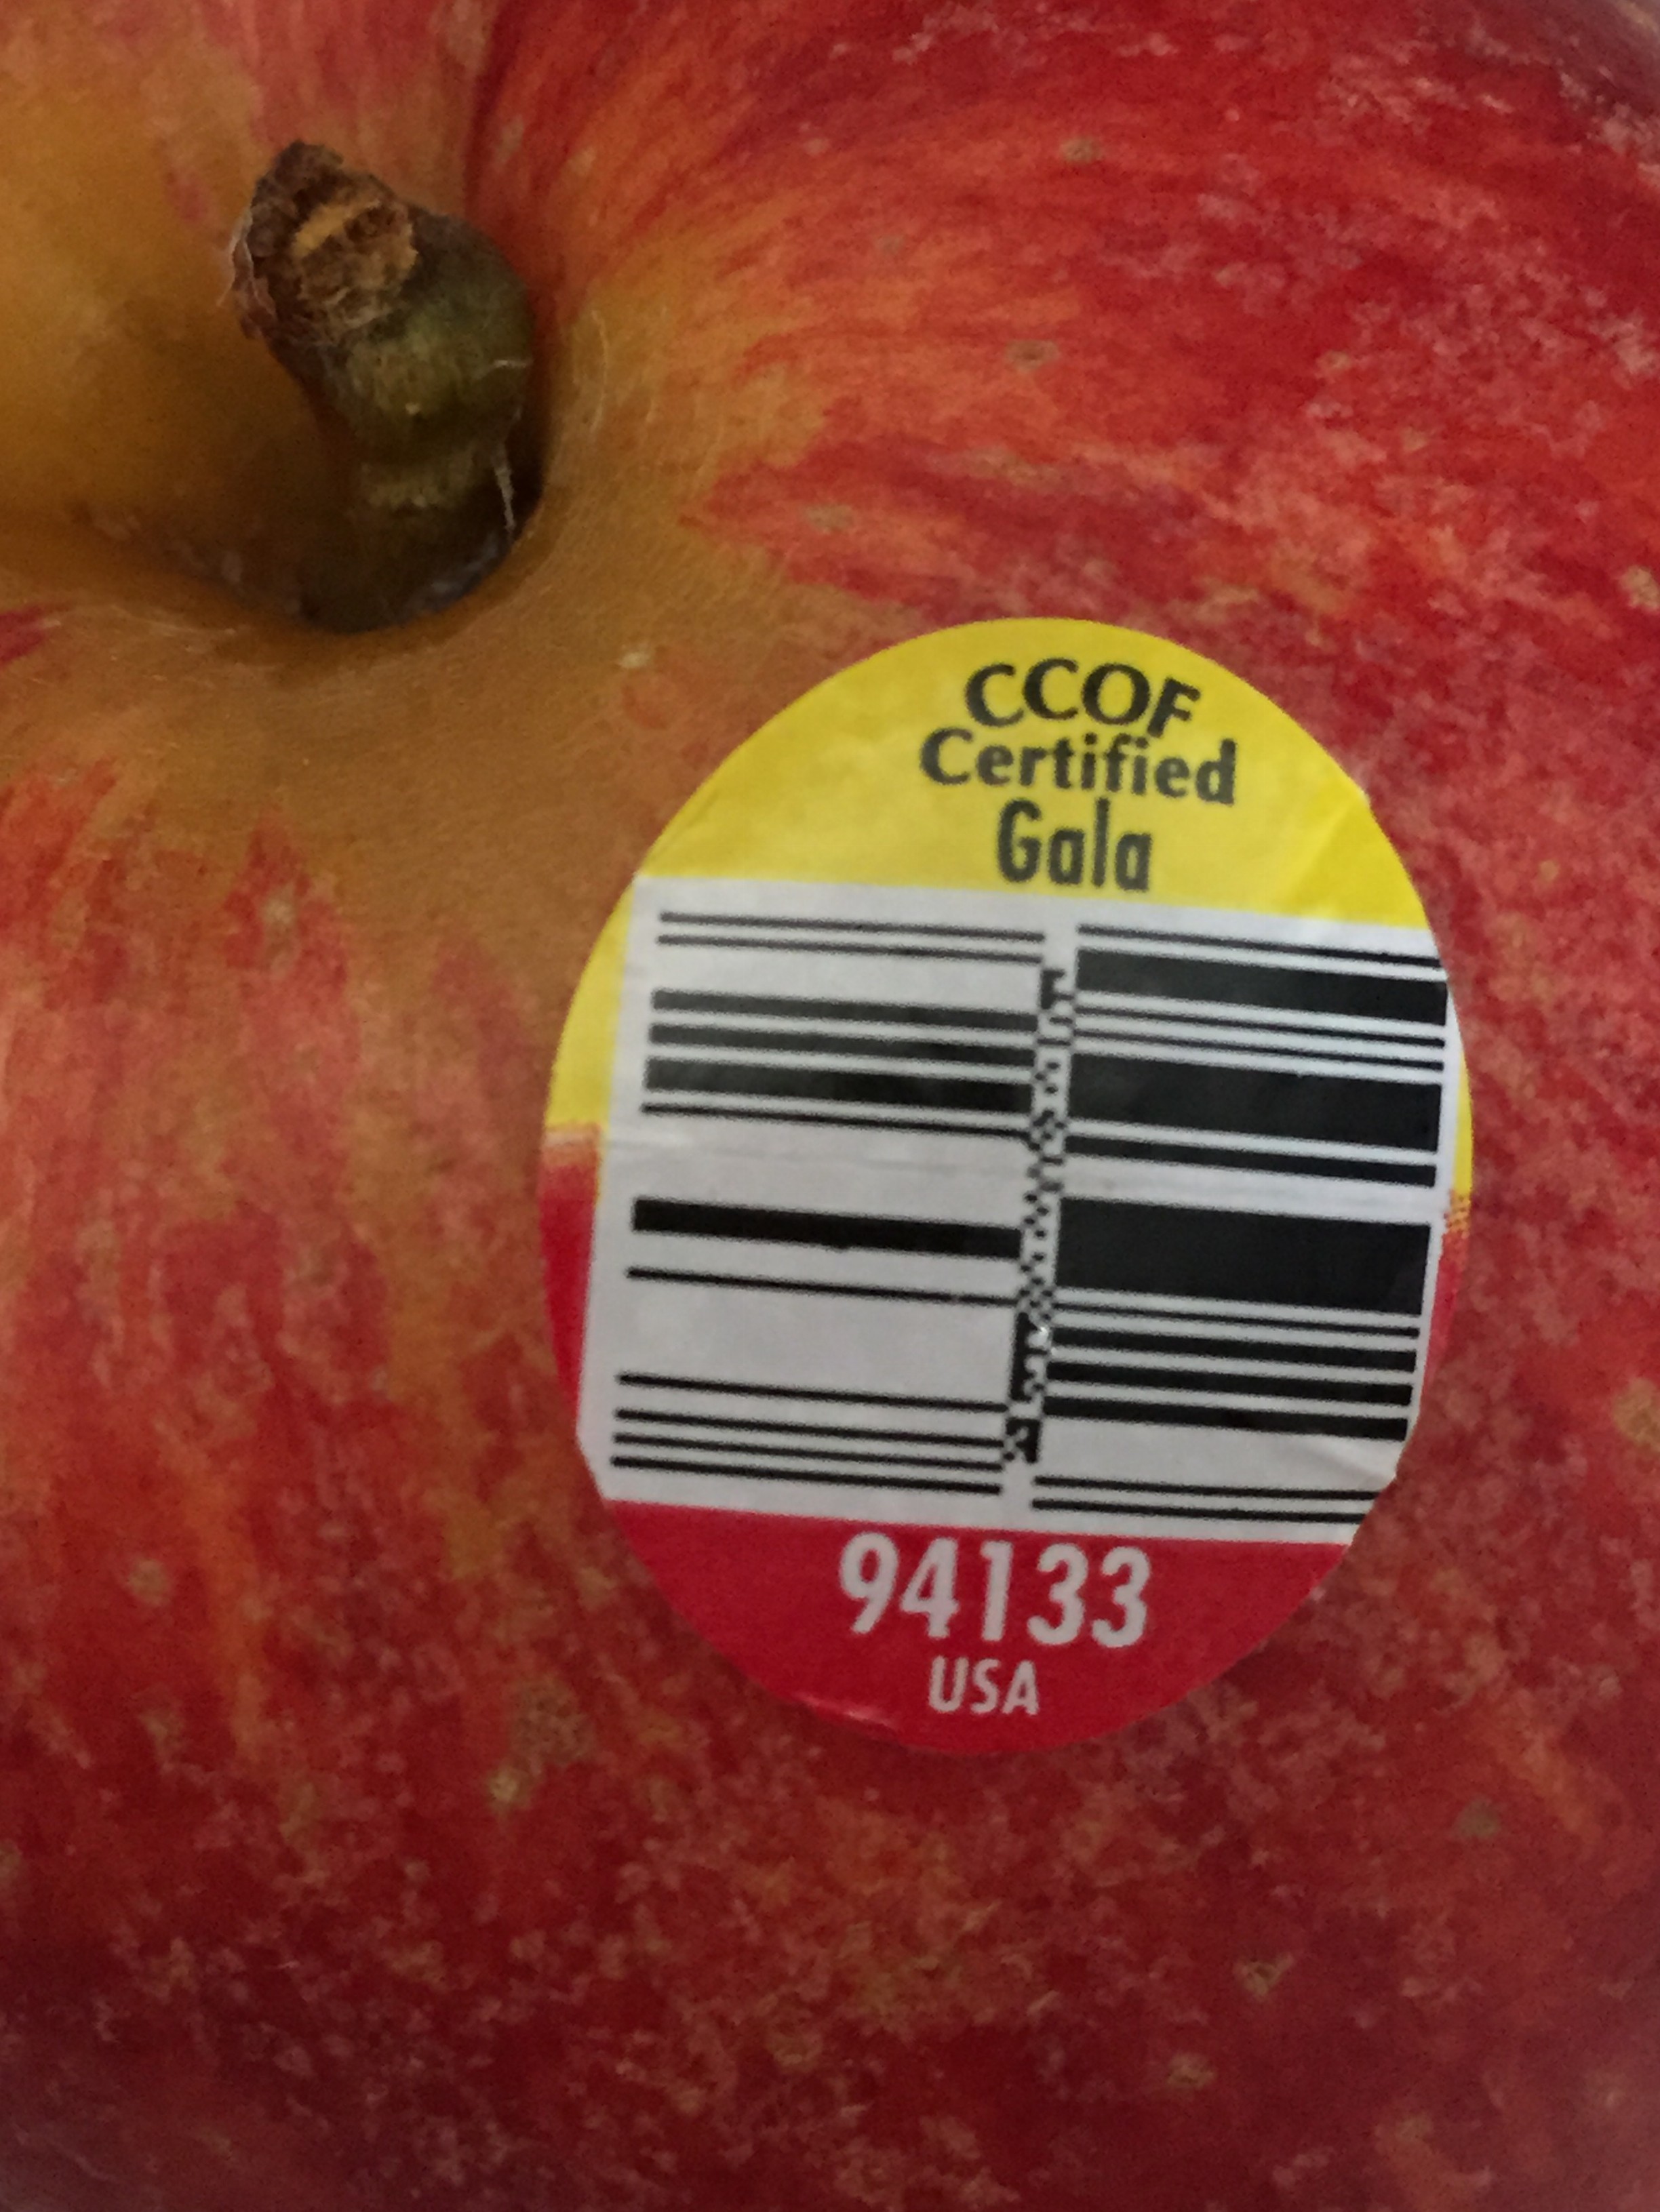
You’ve undoubtedly noticed the little stickers with four- or five-digit numbers on them that supermarkets put on individual pieces of produce. These stickers sometimes also identify the variety; for example, an apple might be marked “Gala” or “Fuji.” (Bins containing bulk items, such as granola and nuts, are often similarly labeled.)

The numbers on those stickers are PLU (Price Look Up) codes randomly assigned by the International Federation for Produce Standards (IFPS). When cashiers ring up your order, they key in these codes to identify the item being weighed or measured.

If you know what these codes mean, you can tell how (and sometimes even where) the food was raised. For instance, a PLU code can tell you if that head of lettuce you’re holding is organic or conventionally grown.

Deciphering the PLU Codes on Produce Stickers

PLU codes can have four or five digits and start with the numeral 3, 4, 5, 8, or 9.

8425394118_1b757e0504_o

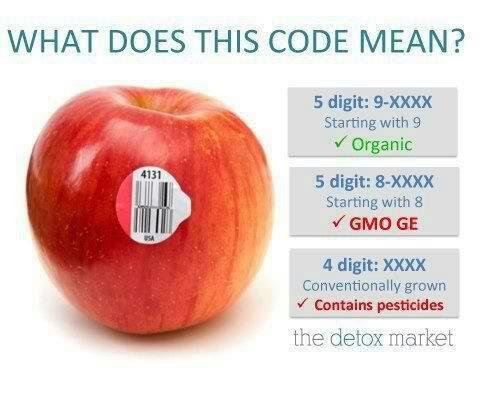
Four-digit PLU codes beginning with 3 or 4 denote conventionally grown produce. For instance, conventionally grown Fuji apples like the one in the photo above are assigned the PLU code 4131.

PLU codes beginning with 5 identify transitionally grown produce. This means the food was grown under conditions that meet organic standards, but for which the certification process has not yet been completed. A 5000 series PLU code can also mean the produce was grown on land that has not been free of chemical usage for the required length of time (36 months) before it can be classified as organic.

Both 8 and 9 are used as leading digits in five-digit PLU codes. In other words, 8 and 9 are prefixes to standard four-digit PLU codes and have special meanings that provide additional information about the item.

5189399089_c6ee3e62ec_o
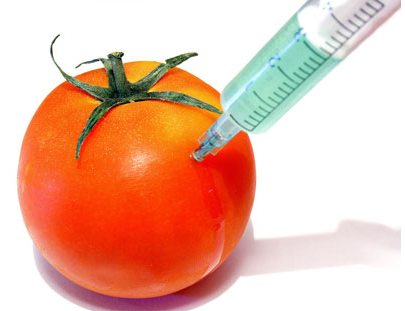
A standard four-digit PLU code prefixed by an 8 indicates the item is a Genetically Modified Organism (GMO) containing genetic information from an entirely different species. Very little is known about the possible long-term effects of eating GMO foods. For this and other reasons, many people choose to avoid GMO foods altogether.
3759753230_1e8f9174d9_o

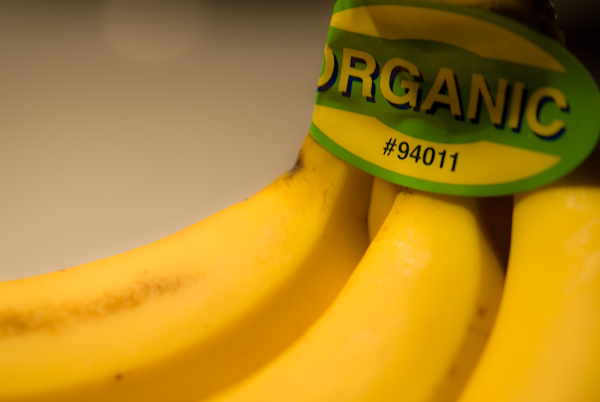
A five-digit PLU code that begins with a 9 indicates the item is organic

They Don’t Want Us to Know It’s GMO

Okay, let’s assume you know how read PLU codes. Can you now feel confident you’re making the safest choices for your family and not drive yourself crazy worrying if the product you’re buying might be loaded with pesticides or if it’s a Genetically Modified Organism (GMO) food engineered in a laboratory? Well, maybe. Read on!

Although this labeling system seems straightforward on the surface, herein lies the rub:

Because PLU codes aren’t mandatory, companies can label GMO foods as conventional.

The truth is, unless it’s labeled as certified organic, most of the corn, soybeans, canola, cotton, papaya, and squash being sold today is genetically modified.

According to Consumer Reports, an estimated 60 to 70 percent of foods, including packaged goods, contain genetically modified ingredients. Dreadful, isn’t it?

412798106_f6f4497749_z

Even worse, you will rarely see a PLU code that begins with an 8 because GMO awareness is rapidly gaining traction and manufacturers are afraid that labeling GMO foods will impact their profits. And they can get away with it because the FDA has determined that GMO’s are substantially equivalent to their conventional counterparts. According to our government, there’s no difference between conventional and GMO foods, despite the fact that plenty of studies show otherwise.

How to Be Confident about What You’re Buying

Even though PLU codes can’t be trusted entirely, there are a few ways to ensure the produce you’re buying isn’t genetically modified. You can choose

  • Items labeled 100% organic or certified organic
  • Items labeled GMO-free
  • Items with PLU codes that begin with a 9

But what can you do when the selection of organic produce is slim to non-existent?

Fortunately, the Environmental Working Group’s (EWG) “Shopper’s Guide to Pesticides in Produce” is a terrific resource that can help simplify decisions at the grocery store.

ewg

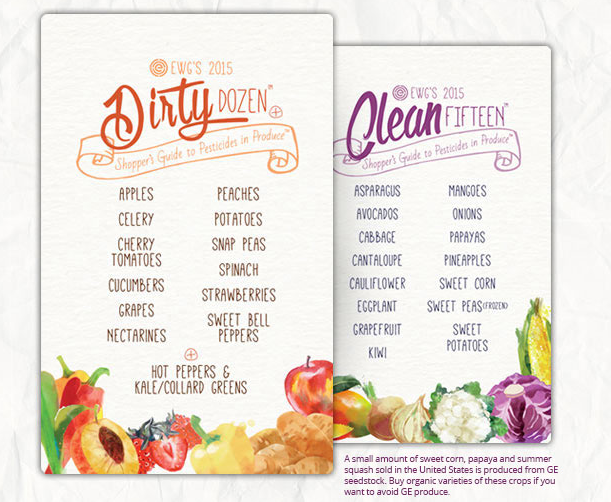
EWG singled out the produce with the highest pesticide loads for its Dirty Dozen™ list. These are the foods you want to AVOID at all costs.

Similarly, EWG’s Clean Fifteen™ lists the produce that’s least likely to hold pesticide residue. You’ll notice a lot of these items have thick or layered skin, like onions, avocados, and pineapple. These are foods you can feel good about buying when their organic counterparts aren’t available.

Clean Fifteen foods are also a safe bet when you want to shave some money off your grocery bill or need to stay within a tight budget.

So, as you can see, labeling laws are sneaky and interpreting the PLU codes on fruits and veggies is a bit trickier than reading the labels on canned and boxed products found on supermarket shelves. But, as a savvy shopper, you can feel confident you’re buying the very best quality produce available without breaking the bank.

By the way, if you sign-up on the EWG website, they’ll send you a PDF version of their Guide for free. If it’s more convenient, you can access the Dirty Dozen and the Clean Fifteen using these resources too:

Authored by Anna Paige.


How to Avoid Canning Disasters

When I was a little girl, canning day in my grandmother’s kitchen was practically a sacred event. Every year, as summer drew to a close, Grandma got her canning supplies out of storage and went to work putting up her mouthwatering relishes, piccalilli, pears in cinnamon syrup and, if we were lucky, the wild mushrooms we’d foraged in the woods the previous day. I remember my grandmother being almost obsessive about sterilizing her jars and lids. She inspected each jar of food with an eagle’s eye to make sure the vacuum seal was good and tight “so nobody gets sick.”

jelly jars

From time to time, one of my grandmother’s friends from the Old Country would drop by with a jar of home preserved mushrooms. Among the old women in her circle, giving away some of the wild mushrooms you’d picked and canned yourself was akin to giving away some of your gold. Grandma always made an appropriate show of receiving these precious gifts—and then rushed off to toss them in the trash as soon as the gift-giver left. I’d stare at her, wide-eyed and pleading, every time she deposited one of those coveted jars of wild mushrooms in the giant barrel behind the house. “So nobody gets sick,” she would say. Because Grandma never trusted anyone else’s canning skills, I developed a healthy respect for the science of preserving foods at a very young age.

Today Grandma’s canning methods are no considered longer state-of-the-art. What’s changed since then? Well, genetic engineering, for one thing. Modern tomatoes are less acidic and more disease resistant, for example. In addition, food science research has brought about the development of newer, safer preservation techniques. It turns out that Grandma’s boiling water bath wasn’t the safest way to preserve those wild mushrooms after all. If she were putting up mushrooms today, she’d be using a pressure canner. Thank goodness Grandma was so careful. Had she been less diligent, we all might have gotten sick—or worse.

Where Things Can Go Wrong

Perhaps you had a Grandma who passed her canning recipes down to you, too. If so, be sure to consult a trustworthy resource for current canning guidelines so you can adjust the outdated instructions for your heirloom recipes. The USDA’s Complete Guide to Home Canning is often recommended.

Fresh fruits and vegetables contain enzymes that go to work breaking down the food as soon as it’s harvested. Spoilage can also occur as a result of oxidation. We’ve all seen a cut apple turn brown when it’s exposed to air. During the canning process, heat stops the action of enzymes and causes oxygen to be expelled from the jars, which prevents the preserved food from spoiling. Heat also kills microorganisms such as yeasts, molds, and bacteria. But this is where it gets tricky.

One type of bacteria—the (sometimes) deadly botulism toxin—thrives in low acid, low oxygen conditions and can survive being boiled at 212 degrees Fahrenheit. Meats and vegetables, including Grandma’s wild mushrooms, are low in acid, which makes them particularly susceptible to botulism. To preserve these foods safely, you need a pressure canner which, unlike a boiling water bath, can reach temperatures high enough to kill botulism (over 240 degrees).

How to Tell If the Food Has Gone Bad

Even when you’re as diligent as my grandmother was about following proper canning techniques, home preserved foods occasionally spoil on the shelf. Always inspect each jar carefully before consuming the contents. Examine the exterior and look for a broken seal, chipped glass, a bulging lid, or leaking. When you open the jar, check for signs of spoilage such as an “off” odor or color, or a layer of green or fuzzy mold growing on the surface of the food. If you suspect the food is spoiled, THROW IT OUT! Do not taste it or attempt to salvage the contents by scraping off the mold or cooking the food a second time.

moldy sauce

Jars of food that show no signs of spoilage can still be contaminated with botulism, which is why my grandmother threw away the home preserved mushrooms she received as gifts. Botulism is odorless, colorless, and tasteless. So take Grandma’s advice and dispose of any low-acid foods that were canned improperly, even if they show no signs of spoilage. DO NOT eat preserved low-acid foods under any of the following circumstances:

  • The food wasn’t processed in a pressure canner.
  • The temperature gauge on the canner was inaccurate.
  • Well-researched and up-to-date processing times and pressures were not used.
  • Ingredient proportions were changed from the original recipe.
  • The processing time and pressure were not appropriate for the altitude at which the food was processed.

Worst Case: Botulism

If you suspect a jar of low-acid food is spoiled, always assume it’s contaminated with botulism. Be sure to following special handling procedures for disposal. If the jar is still sealed, place it in a heavy-duty plastic garbage bag and tie it closed. Take the bag outside and place it in the trash bin, or bury it in the ground under at least two feet of soil. If the seal is broken, or if the jar is open or leaking, the jar and its contents must be detoxified before you disposal. After detoxification, you’ll need to clean up any surfaces that came into contact with the contaminated item, including countertops, can openers, or clothing.

How to Detoxify Contaminated Jars

  • Wear rubber gloves.
  • Place the jars and lids on their sides in a large pot or canner.
  • Wash your gloved hands.
  • Add hot water to approximately one inch above the jars. Be careful not to splash, as this will spread contamination.
  • Put a lid on the pot and heat to boiling.
  • Boil for 30 minutes.
  • Cool and then throw the containers, lids, and food in the trash or bury everything in the ground under two feet of soil.

How to Clean Contaminated Surfaces

  • Wear rubber gloves.
  • Mix up a fresh solution of 1 part Clorox (5 to 6% sodium hypochlorite) to 5 parts water.
  • Spray surfaces with the bleach solution. Let stand 30 minutes.
  • Wipe down the treated areas with paper towels, then place the paper towels in a plastic bag before throwing them in the trash.
  • Treat all affected surfaces with the bleach solution a second time. Let stand 30 minutes, then rinse.
  • Wash all detoxified surfaces and clothing.
  • When finished, throw the rubber gloves in the trash.

Women washing hands in white sink good suds

Home preserved vegetables are the most common cause of botulism outbreaks in the United States. But there’s no need to worry, as long as you preserve the foods using correct, up-to-date methods and take care to inspect the containers for signs of spoilage before consuming the contents.

Why not make canning day a special event at your home, too? Involve the whole family! Children love “helping” in the kitchen. For them, canning is fun, educational, and a wonderful way to make memories they’ll cherish forever. By preserving your own foods, you can enjoy the bounty of your farm and garden all year long. Canning also saves you money and minimizes waste. You can preserve any extra food you can’t use right away when a bumper crop comes in, or when you slaughter livestock. And when your local supermarket has a big sale, you can stock up without worrying that it might not all fit in your freezer. If you’re a prepper or live off the grid, you’ll appreciate the convenience of long-term food storage without need for electricity. Sure, canning is work and requires time, a few pieces of special equipment, and a little research up front. But when your family is sitting at the dinner table in the middle of January enjoying a scrumptious sauce made from last summer’s sweet tomatoes, you’ll be so glad you made the effort.


Authored by Anna Paige