
|
|
Author Archives: Homesteader's Supply


How the Bottles you use for your Kombucha can affect the Fizz!
(Our newest contributor, expert Kombucha maker Ron Chapdelaine, check him out on Facebook – The STEALTH House Naked Kombucha Factory. Here he shares with us why we may think we’ve made our Kombucha just right, but have no fizz! No fizz means no fermentation. The answer may be in the bottles we are using. Have more questions for him, send them to us and we’ll get answers for you!)
Dear Kombucha lovers,
Jerri at Homesteader Supply suggested I write something related to kombucha so here is something useful that we can all benefit from.
How many of you keep your empty GT kombucha bottles for your own kombucha bottling needs? Is it a good idea to reuse GT kombucha bottles? The answer is yes and no…. Yes if you use GT caps and no if you switch to generic caps when the seal on the GT caps wear out (after about 2-4 batches). Understand that GT kombucha bottles and caps are 100% proprietary as noted by the GT kombucha stamping on the underside of the bottle. In short, like several of the big commercial kombucha companies, GT’s has a bottle engineer design a mold to very specific specs mandated by GT’s. The mold is built by a bottle manufacturer in China and the manufacturer who builds and owns the GT mold (GT does not own its own mold) uses it whenever GT’s places an order usually for 500,000 bottles per order. Once the order is placed, the bottles are created and shipped in a container from China to GT’s massive distribution center in California. You may ask why does GT’s kombucha go through the hassle of proprietary bottles? The short answer is so you don’t reuse its bottles.
The Glass Packaging Institute (GPI) is responsible for establishing uniform standards for glass neck finishes. All of the 38/400 replacement caps you purchase for your GT bottles are certified GPI; however, a proprietary bottle does have to be manufactured under GPI standards. Even though a 38/400 (neck diameter of 38mm and fits a bottle with a 400 GPI thread finish) after market GPI certified cap fits perfectly on a GT Dave proprietary bottle it does not mean it will provide a perfect seal crucial to maintaining kombucha natural carbonation during the curing period. In fact, a GPI 38/400 cap may seem to fit perfectly on a GT cap but it truthfully does not create a good seal because the diameter on a GT bottle is actually a tiny bit smaller than the standard GPI 38/400 bottle. Therefore, a GPI 38/400 cap actually has a tiny bit larger neck diameter so when you use an after market 38/400 GPI cap, it is slightly larger that GT’s so carbonation will seep out during curing time and within a few days your kombucha will be totally flat never able to cure properly making all your hard work a lost effort which is what GT wants.
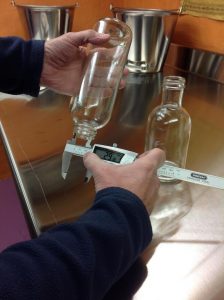
GT’s knows this and that is one reason why they have proprietary bottles. They would rather waste resources and landfill real estate than have you reuse its bottles. See two attached pictures – one measuring the inside diameter of a GT kombucha bottle @ 29.18 and the other measuring the inside diameter of a GPI 38/400 standard bottle @ 30.09. Notice the GPI certified 38/400 bottle is slightly larger in diameter than the GT proprietary bottle. When your GT caps wear out and you use GPI 38/400 caps that are designed for a 30.09 neck they are too large for a GT Dave 29.18 neck so carbonation will leak out quite quickly. You may say the difference is not material but it is material….try sticking a pin through the sidewall of your tire. Now you have a slow leak and within a short amount of time your tire will be flat. My advice is to avoid GT kombucha bottles and to purchase your own bottles certified GPI. A good place to purchase your own bottles is Filmore Bottle in PA, Burch Bottle in NY or SKS Packaging.
You will have a peace of mind that whatever cap type you use, it will be designed for your bottle ensuring your carbonation stays intact. I welcome your comments.
Enjoy and have fun!
Ron Chapdelaine
Visit him on Facebook – The STEALTH House Naked Kombucha Factory
Click here to get Kombucha supplies!
Want to buy Ron’s Kombucha? Contact him on his facebook page!
Making Kombucha!
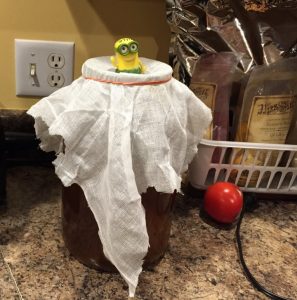
Freshly made Kombucha fermenting on the counter with a happy minion!
The weekend right after Thanksgiving was my time to start thinking about healthy eating again. Right after the all the stuffing, and potatoes, and pies, and ice cream… guess I don’t have to go on, you probably get the drift.
About 2 weeks ago a friend gave me a scoby, or starter culture for making Kombucha. I watched him drinking Kombucha every time I saw him. Then of course, I had to start buying it again at the grocery store which can get expensive. I love the different fruit flavors and the fizz. It reminded me of how delicious my Kombucha was when I made it about a year ago, but as usual, I got so busy I stopped making it. I bet all of us have had an experience like that… dropping something that is good for us because of the “I’m too busy” reason.
Now that my fresh Kombucha has fermented for about 10 days or so, it was time to bottle it up. I had just shy of one gallon of Kombucha which filled five 16 ounce e-z flip or grolsch bottles. So I thought I’d share my recipe and process so you could see how relatively easy it is.
What you need to for making Kombucha
- 1 Kombucha Scoby or mother culture… you can buy them or get someone to give you piece of theirs
- 1 cup of raw organic sugar or coconut sugar
- 3/4 gallon non-chlorinated drinking water
- 2 tbsp fresh tea leaves ( I use English Breakfast Tea) (or you can use a decaf tea like Rooibos)
- 1 cup of starter tea ( the liquid that comes with the Scoby or mother culture)
- Gallon jar
- Stainless Steel strainer/filter
Brew your Kombucha
- Bring the water to a boil, then turn off the heat.
- Add your tea to the hot water and let it steep for 10 minutes. I place my tea into the middle of a piece of cheese cloth, then bring up all the corners and tie it closed. This method makes it easy to remove the tea from the water after 10 minutes. Otherwise you can put loose leaf tea into the water and then strain it out.
- After 10 minutes, remove the tea. Then slowly add the sugar into the water, stirring to make sure it all dissolves.
- Pour the tea into your brewing bottle or container. We use a one gallon glass jar.
- Let the the tea cool down to room temperature.
- At room temperature, slowly add the Scoby or mother culture along with 1 cup of the starter tea that came with it.
- Cover your jar with cheesecloth, secured with rubber band. Wait about 4 days and then start tasting your Kombucha. Each day taste it until you find a flavor you really like. Remember, it shouldn’t be sweet, as the sugar is used up in the fermenting process.
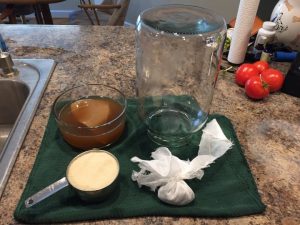
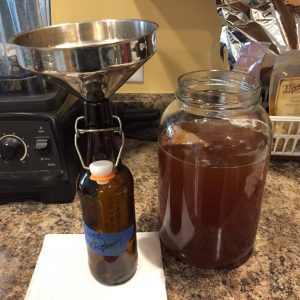
Mother Culture, cup of raw sugar, gallon jar, and tea ball.
I allowed mine to ferment for about 10 days. I could see some bubbles at the top, and I could see that the mother culture was now floating on top… a good sign.
Bottle your Kombucha to make fizzy drinks
- Clean and set up your E-Z Flip or Grolsch bottles.
- Cut up pieces of fruit to flavor your Kombucha fizzy drink. I always use about 1 tbsp of cut up fresh raw ginger in every bottle. Then I add some different fruit in each one. I use freeze dried fruit, seems to work perfect for this process. This day I used some raspberries, apple, peach, and apricot. You only need about 1 tbsp of cut up fruit to each bottle. I love to have a variety to choose from. You can use fresh fruit too! Have fun and experiment!
Adding fruit to your bottles!
Filtering when filling the botles!
- Place a filter with a stem into the bottles. Pour your Kombucha into the filter and allow it to drain into and fill the bottles. Cap your bottles securely.
- Made sure you leave at least a cup of Kombucha tea along with your Scoby to start the next batch.
- Place tape on each bottle and label the fruit you added along with the date it was bottled.
- Leave bottles on the counter at room temperature for about 4 days. Then place into the refrigerator.

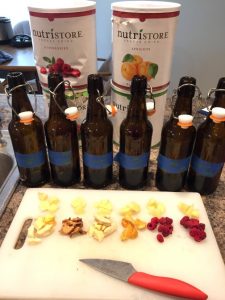
Bottles Full, Ready to make more Kombucha!

Happy Kombucha!
When you open your bottles of Kombucha, you will enjoy a variety of fizzy fruit flavored beverages that are so enjoyable to drink and healthy for you too! Enjoy… jerri
We Won a Top 100 Homesteading Blog Award!
 We’re proud to announce that our humble blog won a “Top 100 Homesteading Blog” award! Homesteader’s Supply made #42 in Feedspot’s list of the Best Homesteading Blogs on the Planet.
Congrats to all our fellow homesteading bloggers who were also awarded this honor!
Why You Need to Wash Homemade Butter
 Have you ever been told that it makes no difference whether or not you wash your homemade butter? Do you think it really matters all that much one way or the other? Wouldn’t it be easier and faster to skip the washing step and just work the buttermilk out of the butter?
Here are the answers to the above questions:
- They lied.
- Yes, it actually matters a lot.
- Um, that would be a NO.
Are you surprised by any of these answers? If not, then you’re an expert butter maker. Congratulations!
Let’s take a look at the science of butter-making to see why washing the butter is a critical step in the process. An effective way to determine whether a procedure is important is to find what happens when it doesn’t get done. That’s a good place to begin our discussion. Continue reading
Top 10 Reasons to Eat Locally Grown Food

About 10 years ago, consumer preferences slowly started shifting away from conventionally produced foods to locally grown. The 2007 release of Michael Pollan’s book, The Omnivore’s Dilemma, was largely responsible for this change. Once awakened to the consequences of our food choices, many of us became much more conscious about what we were eating, how it was made, where it came from, and how it got on our plates. That book heightened awareness about our dependence on agribusiness and the moral and ecological consequences of our food choices.
Today, consumer demand for locally grown food is greater than ever. More and more, Americans are starting to understand that locally grown food is healthier, and that it benefits our local farmers and communities.
Let’s take a look at the top 10 reasons to eat locally grown food. Continue reading