Category Archives: How-To

Making Healthy Eating More Affordable – Part 1 (Bowls)

bowls

This is the first in our series of articles on making healthy eating more affordable. The Internet is flooded with money-saving ideas, but most of them focus on the smart shopping aspect. Here, we’re going take a different tack and talk about things you can do to bring down your food costs after you’ve left the grocery store. One topic that’s largely ignored is how you can save money by changing the way you present (or serve) the food you’ve already purchased and prepared. And that, my friend, is the subject of our first article!

During the Great Depression, home economists and women’s magazines taught housewives how to “stretch” their food budget because food was scarce back then. They learned how to make pricier ingredients, like meat, go farther by combining them with less expensive ingredients, like macaroni. And so, casseroles became very popular, as did meals that consisted of a little bit of meat in a sauce or gravy that was poured over a starchy food, like biscuits or a potato. Of course, nowadays, meals like chipped beef on toast are considered old fashioned and aren’t particularly well-liked in the United States, with possibly a few regional exceptions.

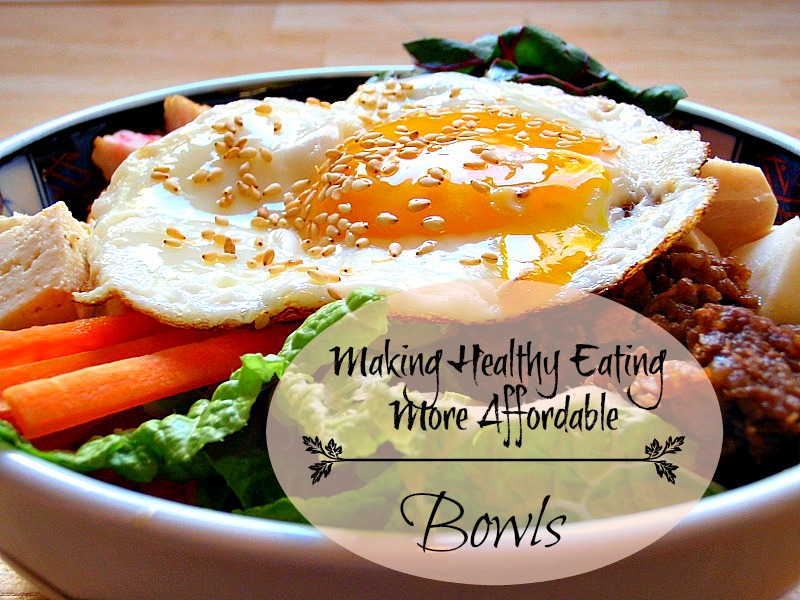
Today, we have a healthier option that’s based on the idea of “stretching,” yet allows us to enjoy a wider variety of healthy and delicious whole foods and more sophisticated flavors. The very simple concept of a “meal in a bowl” (called a bowl for short) has gained enormous popularity in recent years and seems to be taking the culinary world by storm because the food combinations are virtually limitless. This leaves plenty of opportunities for home cooks and professional chefs to improvise and experiment with new flavors. You can make your bowl as humble or as refined as you like. But, even the humblest combination of ingredients can pack a serious nutritional punch!

A bowl is an attractive layered meal intended for one person. When making a bowl, you typically start with a base of whole grains, on top of which you pile a variety of vegetables in layers. Here’s where you get to go wild with your colors! Remember, everything doesn’t need to be raw. Keep things interesting by adding some roasted, grilled, pickled or fermented veggies, and maybe even a little fruit (like grilled pineapple). Then, on top of the veggies, add two or three ounces of meat or other protein (like fish, egg, cheese, beans or other pulses, baked tofu or tempeh that’s been marinated and sautéed). Choose a sauce that compliments the flavors in the meal and then drizzle (or pour, if you a like a lot!) it over everything. Finish up by adding a layer of crunchy ingredients, like nuts or seeds, on top to give the meal some texture. Optionally, you can sprinkle on some fresh herbs or other zesty ingredients (like pickled ginger) to make the flavors pop even more.

One of the greatest things about a bowl is its versatility. Bowls allow a great deal of flexibility as far ingredients are concerned. It’s easy enough to mix-and-match ingredients, and to substitute one ingredient for another. No spinach? Use Swiss chard or your favorite green. Out of rice? Substitute quinoa. It’s as easy as that! You can serve your bowl hot or cold, simply by varying the ingredients.

Another wonderful thing about a bowl is that you can put a meal together quickly, and it’s not a lot of trouble to prepare a meal for one when dining alone. It can be very easy, and it never has to be boring. Many ingredients can be prepared in advance. For example, you can pre-cook your grains or meat, divide it into portions, and freeze it. When planning your next meal, just take as many portions as you’ll need out of the freezer and defrost them. Similarly, you can hard boil eggs and keep them (unpeeled) in the refrigerator for up to a week.

Sturdier vegetables like onions, carrots, bell peppers, and cabbage can be sliced, chopped, or shredded ahead of time and stored in air-tight containers in the refrigerator to be used in the next day or two. Fruits that won’t turn brown when exposed to the air can be stored similarly. Try a variety, like cherries, grapes, kiwis, citrus, pineapple, and mango.

Sauces like store-bought salsa are a cinch. There are also other reasonably healthy commercially prepared sauces available, like Trader Joe’s Teriyaki sauce. But, you don’t need to buy any fancy sauces. Most people can whip up a tasty sauce pretty quickly just using ingredients they already have on hand, such as soy sauce or tamari, toasted sesame oil, olive oil, balsamic vinegar, prepared horseradish, Dijon mustard, mayonnaise, Sriracha sauce, harissa, peanut butter, honey, garlic, ginger, wasabi, lime and so on.

As we’ve seen, a bowl can be very easy to prepare, but you can make it as elaborate as you want. If you’re so inclined, you can create a bowl that’s a gourmet’s delight. More exotic combinations are often inspired by international flavors. In fact, many cultures around the world have their own traditional versions of a bowl. For an example, since ancient times, Koreans have been making a mouthwatering dish called bibimbap, which is served as bowl of warm white rice topped with seasoned sautéed vegetables. For the sauce, they use a combination of chili paste, soy sauce, and fermented soybean paste. Customarily, the bowl is topped with a bit of sliced beef or an egg (either raw or fried).

Bowls rely heavily on plant-based ingredients. Despite all the controversy among the top experts in the field of nutrition today, the one thing they all agree on is that a plant-based diet is ideal. When building bowls, animal products are used in small amounts, if at all. Meat takes a backseat to the veggies and grains, and becomes more like a condiment, adding flavor but not all the saturated fat, cholesterol, hormones, and excess protein that our bodies turn into fat. (Did you think that only excess carbohydrates turn to fat? Not true! Protein does too, if you eat too much.)

Plant-based diets are by far less expensive than eating conventional meals where meat takes center stage. Moreover, eating this way fills you up. You can eat a lot more volume because these foods are low in calories. They’re also loaded with fiber, which helps keep you full longer. And, they’re nutrient dense, so you’re getting loads of antioxidants, vitamins, enzymes, pre-biotics, pro-biotics, and more. Plus, when you’re body’s getting all the nutrition it needs, you tend not to get as hungry, so you eat less food less often. All of these things translate to savings on your food budget.

Furthermore, a plant-based diet is by definition alkaline. Alkaline diets have been shown to strengthen our body’s defenses, help cells regenerate and repair, and protect the kidneys. They also improve our energy, digestion, joints, sleep, and resistance to colds, flu, and severe illnesses like autoimmune disease and cancer. You really can’t go wrong by making bowls a central part of your diet.


So, what would you like in your bowl? Share your ideas with us in the comments!


Legal Disclaimer
This article is for educational use only and is NOT intended as medical advice. The information presented herein is based on the opinions of the author, unless otherwise noted. Any statements or claims about the possible health benefits conferred by any foods or supplements have not been evaluated by the Food & Drug Administration (FDA) and are NOT intended to diagnose, treat, prevent or cure any disease or condition. We encourage you to do your own research and consult a qualified health professional before making any health-related changes.
This article may not be downloaded, reproduced, republished or otherwise copied without express written permission of the author and of Homesteader’s Supply.

All rights reserved ©2016 Anna Paige

Q&A: Does It Hurt to Use Too Much Starter Culture?

A Customer Asked: Does it matter how much starter culture I use to make cheese or yogurt? Will it hurt if if I use too much? Sometimes I use the amount called for, and it doesn’t work. Should I add more?

Jerri’s Answer: Great question! You should always use the amount of starter culture specified in the recipe.

Starter culture contains the lacto-bacteria that grows when the milk is warmed. The culture helps create the acidic environment necessary for cheese curds to form, and for yogurt to set up properly. If you use too much culture, the milk will become too acidic and kill off the lacto-bacteria. And when the environment is too acidic, cheese curds won’t form and yogurt won’t set up as it should.

If curds didn’t form as expected even though you added the correct amount of rennet and starter culture, it’s often because there was problem with the milk. The milk might have come from a cow that had a sub-clinical infection. When undesirable micro-organisms are present in the milk, they can interfere with the process and prevent the rennet and starter culture from working. As a result, curds don’t form properly when making cheese. Similarly, when making yogurt, the starter culture is inhibited from working as it should, and your yogurt doesn’t set up to a thick consistency.

In these situations, it’s best to find a different source of milk and try again.

Does Your Homemade Toilet Bowl Cleaner Really Work?

toilet bowl


Many of us prefer to make our own cleaning products because they are much less expensive than commercial brands. Plus, they’re made from common household ingredients that are non-toxic and biodegradable, so we trust them to be safe for us and our pets, and also good for the environment. And, in most cases, that’s true. However, your homemade toilet bowl cleaner could be deceiving you. Sure, the toilet looks clean when you’re done, but is it, really?

If you search the Internet for “homemade toilet bowl cleaner,” you’ll find an overwhelming number of recipes. But, if you look closely, you’ll see most of them are the same—or at least very similar. All the recipes call for baking soda and regular white vinegar. And then, some say to add a few drops of castile soap and/or a few drops of tea tree oil (or another anti-bacterial essential oil).

The theory here is that the baking soda will act as a mild abrasive that aids in scrubbing off the grime and hard water deposits. Then, the vinegar, which is 5% acetic acid, will act as a mild disinfectant. Good old fashioned soap boosts the cleaning power. And finally, the tea tree oil, which is a much stronger disinfectant, will blast away what’s left of the germs.

If you’ve ever tried this recipe, you know that when you add vinegar to baking soda, it fizzes like crazy. This can be fun to watch, and the fizzing action gives the impression that it’s working. But—here’s the kicker—in reality, it isn’t doing anything!

Here’s why. Any eighth grader who’s been paying attention in chemistry class could tell you that baking soda is a base and vinegar is a mild acid. When you mix the two together, they cancel each other out. In this case, it causes a chemical reaction that produces water and a type of salt. It also produces a tremendous amount of carbon dioxide gas, which is what causes all that fizzing.

So, at this point, if you scrubbed with the baking soda first before adding the vinegar, your toilet is probably a little less grimy. But it really isn’t any cleaner, and it certainly hasn’t been sanitized in the least because once the vinegar hit the baking soda, it got transformed and lost its disinfectant properties. All that’s left in your toilet now is water and a little bit of salt, neither of which is an effective cleaning agent.

If your homemade toilet bowl cleaner recipe calls for castile soap, adding a little bit at this point will at least give you the dirt transporting ability of the soap. Well, maybe… But, if there’s any vinegar left over that didn’t react with the baking soda, then it will react with the soap! That’s because castile soap is a base too—just like baking soda!

Vinegar breaks down (unsaponifies) castile soap and reduces it to the oils that were originally used to make the soap. So what you end up with is some whitish, curdled goop floating in your toilet bowl. Even worse than having no cleaning power at all, this oily goop gets all over whatever you were trying to clean, and everything you used to clean it. So in this case, you have a greasy toilet bowl and a greasy toilet cleaning brush. Yuck!

This recipe doesn’t seem to be working very well at all so far, is it?

The final step, which only a few of these DIY recipes recommend, is to add an antiseptic essential oil, such as tea tree oil. It takes a fair amount of tea tree oil to be effective because it gets diluted when you add it to the water in the toilet bowl. How much tea tree oil do you need? No one seems to know, exactly—although some recipes recommend adding 50 drops or as much as a teaspoon or so. But essential oils are expensive, and some folks feel that adding them defeats the purpose of making your own toilet bowl cleaner because it’ll end up costing more than a commercial product. But, here’s the rub. Even if you decide that adding tea tree oil is worth the added expense, you won’t be getting much bang for your buck because the antiseptic properties of tea tree oil aren’t strong enough to kill viruses and robust bacteria.

So, bottom line, that popular homemade toilet bowl cleaner recipe is not much more effective than swishing your toilet bowl out with plain water. Indeed, if you added castile soap, it could be making your toilet even dirtier because the unsaponified oils coating the interior of the bowl provide an inviting surface for bacteria to stick. And finally, the tea tree oil, if you choose to add it, is not an effective antiseptic, unless you add a LOT. But that could bust your budget in a jiffy. And even then, it’s not really doing the job well, anyway. So, if you’re concerned about your family’s health, you might want to avoid “cleaning” your toilet with a homemade toilet bowl cleaner.


Can you think of a way to modify this recipe to make it more effective without busting out the bleach or other toxic chemicals?


Authored by: Anna Paige

How to Fix Your Health by Fixing Your Gut

Did you know that your body’s overall health depends on the bacteria in your gut? It’s true! We have more bacteria in our GI tract than we have cells in our bodies. Collectively, these colonies of gut bacteria are called the microbiome. Scientists estimate the average person has 100 trillion micro-organisms in their gut. About 500 different species have been identified, but only 20 types make up 75% of the total.

bacteriaMany of these bacteria are beneficial, but we can have bad bacteria too. Good bacteria are protective. They help us break down food, absorb nutrients, and guard our immune system. On the other hand, bad bacteria produce toxins that wreak havoc in the body.

Optimum health depends on minimizing bad bacteria. We do this by encouraging more good bacteria to grow, so they crowd out the bad kind. And also, by eliminating the things that damage our gut and feed bad bacteria.

Fermented Foods Promote a Healthy Microbiome

To improve the health of our microbiome, we first need to protect the good bacteria we already have by eating foods that help good bacteria flourish. These include foods that contain prebiotics, which is a type of soluble fiber found in certain plant foods like garlic, onions, and asparagus. Our microbiome also thrives on probiotics, which are living bacteria found in fermented foods like sauerkraut, kimchi, yogurt, and even dark chocolate. Continue reading

Q&A: Why Our Cheese Press Doesn’t Need a Pressure Gauge

A customer asks: I recently purchased your Ultimate Cheese Press and now I see that it has no pressure gauge. Many of the cheeses I’d like to try need to be pressed at a certain pressure for a certain amount of time. Can I make those cheeses with this press, and if so, will the texture come out right? I’d like to know how I can make sure I’m putting the correct pressure on my curds.

Ultimate Cheese Press

Ultimate Cheese Press

Jerri’s answer: Yes, you can make any type of cheese using our Ultimate Cheese Press. No pressure gauge is needed on any press because cheesemaking is a natural process and the whey will release only when it’s ready. The release of whey depends on many variables, such as the temperature at which the cheese was made, the temperature of the curd going into the press, the pH, the type of cheese, and sometimes I like to say the phases of the moon because you just never know. Cheesemaking is more of an art than pure science.

A long time ago, someone wrote recipes for the old fashioned danish cheese presses that used hanging weights to apply pressure to the curd. Then some folks took those recipes and transferred their weight information into modern recipes for presses that have a mechanism in place for applying pressure. And then, some folks decided that modern presses must need a pressure gauge, and so they built one into the press.

The pressure gauges on today’s presses aren’t particularly accurate because they base the amount of pressure on the number of turns of the handle. Of course, depending on the hardness of the cheese, and depending on whether pressure is applied near the beginning or the end of the process, the amount of pressure being applied varies.

Nowadays some manufacturers are adding pressure gauges to their presses. They drive up the cost, and they’re just not necessary.

The bottom line is that our press was designed to press any type of cheese the way it was meant to be pressed…that is, the natural, old fashioned way. You do this by transferring the curd into the press, securing the follower on top, and then turning the top knob by hand until it’s tight (not forced). When the whey is ready to release, it will come out of the bottom of the mold. And as it releases, the top knob will become loosened.

So all you need to do for the first couple of hours is to check your press every so often and make sure the top knob is tightened securely. The harder the cheese, the less whey will be released because it was already released before you transferred the curd into the press. A softer cheese, like a Colby, will release more whey. Sometimes you might even see some whey on top of the follower. If this happens, just tip the whole press over to allow that whey to pour out.

So if you have recipes that suggest specific pressures, ignore them. All you have to do is follow the directions for using our Ultimate Cheese Press and your cheese will come out perfect every time!


When you make cheese, you get whey as a by-product. Here’s a question from a customer about whey.

A customer asks: What can I do with the whey that’s left over after making cheese, Greek yogurt, butter, etc.? It seems like such a waste to throw it away.

Jerri’s answer: Whey is loaded with protein, so you definitely don’t want to throw it away! You can use whey in just about anything…soups, sauces, baking, protein drinks, etc. Adding whey to these foods makes them even more nutritious.

Q&A: Having Bread Yeast Nearby When Making Cheese Can Ruin the Cheese

A customer asks:  I’ve been making cheese successfully for quite a while now. But, all of a sudden, right after its done, it starts to grow into an ugly blob and smells awful. Is it contaminated and bad? Did I do something wrong?

Jerri’s answer: Great question! You must be baking homemade bread at the same time, or near the time you’re making cheese. The yeast used for making bread gets in the air no matter what you do.

Culture Sampler

Cheese Culture Sampler Kit

Here’s the solution: Instead of heating the milk first and then adding cheese culture, add the culture while the milk is still cold. Then heat the milk to the start temperature and continue with the recipe as usual.

There is competition between the bread yeast and the bacterial culture. When you heat the milk first, the yeast grows fast and kills off the bacterial culture when you add it to the milk. But when you add the bacterial culture to cold milk, the culture starts to grow right away; and then it can overcome the yeast and kill it.

And, by the way, that yeasty blob of cheese won’t hurt you if you eat it, but it’s very unappetizing and it tastes awful.