Tag Archives: Gardening

What to Grow in the Garden – Broccoli, Cauliflower and Cabbage

Cool weather crops are those that do well in…well…cool weather. They often bolt (go to seed) or their growth stalls when the weather gets hot. If the seed packet says “sow as soon as the ground can be worked,” it’s a cool weather crop. This week we’re going to talk about broccoli, cauliflower and cabbage.

What to Grow in the Garden – Broccoli, Cauliflower, Cabbage

cabbage, what to grow in the garden

Calabrese broccoli, what to grow in the garden, how to grow broccoliBroccoli, cauliflower and cabbage don’t need any special treatment when you plant their seeds. You can start the seeds indoors by sprinkling them on seed starting medium and covering them with 1/4″ of the medium. Keep the medium moist but not wet. In seven to 10 days the seeds will sprout. Outdoors, sprinkle the seeds on rich soil, water in and keep the soil moist. When the seedlings have their first set of real leaves you can either move them to their own containers or space them out depending on where they’re growing. If you’ve grown seedlings in doors you can harden them off and move them outside with a little protection from frost about a month before the last average frost date for your area.

alternating rowsCool weather crops like to have cool feet, and by feet I mean roots. You can crowd the plants enough to keep the sun off the soil when the plants mature without crowding them so much you stunt their growth. The leaves will fill in and create shade that keeps the soil cooler and slows the germination of weed seeds. It’s a great way to save space in the garden.

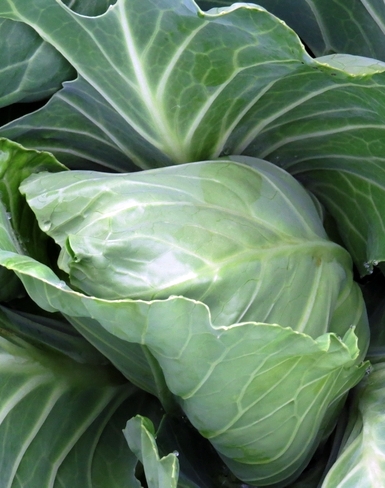
When I harvest cabbage and cauliflower I peal back the large leaves and place them on the ground so that they continue to block the sun from the soil. Those weed seeds are opportunists just waiting for an opportunity to sprout. The leaves will dry and eventually break down to feed the soil.

Snowball_Cauliflower_Seeds

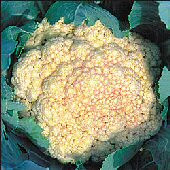
Cauliflower is a little less tolerant of cold and heat than broccoli and cabbage. Use the staggering method of planting your transplants to keep the soil cooler but wait an extra week or ten days before planting. If you have a sudden hot spell and can give cauliflower some shade it will appreciate the break. When stressed, cauliflower might take on a pink or purple tinge.

Keep all three of these vegetables well watered. Watch for pin holes in the leaves, an indication of flea beetles, and larger holes and green droppings on the leaves made by cabbage worms. Treat accordingly.

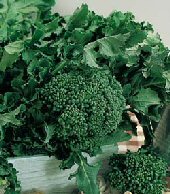
Harvest these vegetables before they start to go by. Broccoli heads are firm when ready to harvest. If the tiny flowers start to open you can should cut it immediately.

early jersey cabbage, what to grow in the garden, growing cabbage

Early Jersey Wakefield

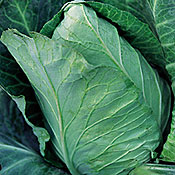
Cabbage firms up when ready to harvest. You can test the heads with a gentle squeeze as they grow to get a feel for  firmness as it develops. If you’re not ready to cut a head that’s ready to be picked you can delay more growth that leads to cracking. Plant your feet firmly, give the plant a tug up and twist it 90* either way. You’ll hear roots tear.

Watch cauliflower for signs of separating curbs or color change and harvest when full grown according to the size stated in its description.

These vegetables benefit from being cut either very early in the door or being submerged in very cold water to remove what’s called “field heat.”

What to Grow in the Garden – Cucumbers

What to Grow in the Garden – Cucumbers

What’s a salad without cucumbers? We need them to add to the tomatoes and peppers. There’s nothing like a fresh cool cucumber sliced thin, salted and mixed with mayonnaise, and piled high between two slices of homemade bread. It’s a summer sandwich we wait months for and enjoy for such a short time.

Straight eight cucumber, cucumber, what to grow in the gardenYou can choose your cucumbers based on the amount of space you have if need be. There are bush varieties suitable for small spaces.  Short vined cucumbers work well in large hanging baskets or wrapped around tomato cages, and long vined varieties that do well on hog or cattle panels, clipped to twine or across trellis. And of course, if you’ve got the space, let them sprawl in the garden.

Cucumbers can be direct seeded in rows or mounds. Amend the soil before planting the seeds. If you’re planting in rows you’ll want to thin the plants to 18 to 24 inches apart. In mounds, plant three seeds in a two foot wide by one foot high mound and leave the two strongest seedlings to grow. If you have a blank spot you can use the third seedling to fill in. Mounds of soil warm faster and drain well but you’ll need to keep an eye on the moisture to be sure they don’t dry out before the roots have reached level ground.

If you want to get a head start on the season you can start your seeds indoors in seed starting medium about a month before you’ll transplant the seedlings. Transplant when the second set of true leaves is forming and before the plants become root bound. Root bound vine crops will be stunted. They are fussier about their roots than most other vegetables.

If you notice tiny cucumbers dying you’ve got a pollination problem. You can hand pollinate them buy moving pollen from a male flower (no cucumber at the base of the flower) to the female flower using a small paint brush or Q-tip.

Straight Eight is our all time favorite slicing cucumber. It’s an heirloom variety that requires about 65 days to maturity. It is prolific so you’ll want to check the plants for mature cucumbers every day or two. You may prune back new shoots on the vines to keep growth concentrated in the cucumbers. Straight Eight is a straight eight inch cucumber great for those cucumber sandwiches.

Water well. Cucumbers that don’t get enough water will be misshapen and bitter. They benefit from soaker hoses that slowly drip water close to the roots and keep the soil moist six to eight inches down. Over watering can lead to tasteless cucumbers but in the summer heat that’s usually not a problem.

To prolong the harvest I plant seeds one week after planting the cucumber transplants. When the transplants have played out the seeded plants will still be producing. Cover the plants when there’s a danger of frost as these plants are particularly susceptible to frost.

What to Grow in the Garden – Plenty of Peppers

Peppers are another staple in the garden. Stuffed, sliced for salad, chunked for dip (cut them into big pieces like those popular corn chips), sauteed for spaghetti sauce, pizza topping – the pepper is a go-to from the garden.

What to Grow in the Garden – Peppers

bell pepper

The last bell pepper of the season

[subscribe2]

  • Bell, commonly known as “green peppers” are the most often grown peppers in the family garden.Bells are also know as sweet peppers. Bell peppers usually start as green and change color when they ripen. They’re edible when they’re green, and probably most are eaten then, but they develop better flavor and increased nutrition when ripe.
  • Hot peppers vary in heat that’s measured on the Scoville heat scale.
    • Sweet, banana and Pimiento are a 0.
    • Ancho and Poblano are 1-2k
    • Anaheim is 0.5 to 2.5k
    • Jalepeno is a 2.8 to 8k
    • Chipotle is 5 to 8k
    • Cayenne is 6 to 8.5k
    • Serrano is 8 to 22k
    • Orange Habanero, Scotch Bonnet is a whopping 150-325k.
    • The world’s hottest pepper is the Carolina Reaper at 1,569,300k.
Jalapeno pepper seeds

Jalapeno Pepper

Seeds are started indoors in cool climates. The seeds are slow to germinate unless the soil is very warm, a minimum of 68*. Optimum soil temperature for germination is 80*. A heat mat beneath the seed starting tray will help a lot. Maximum temperature for germination is 95*.

At 68* soil temperature the seeds will germinate in about 13 days; at 77* to 80* expect approximately eight days. At 77* to 80* you should expect 98% germination. Be sure to keep the soil moist but not soaked.

Harden off the seedlings before transplanting. I prefer to transplant six week old seedlings. Choose seedlings that have not become root bound and do not have blossoms. If you have no choice, pull off the blossoms to force the plants’ growth into the rest of the plant.

Amend the soil before transplanting. Add compost and any other amendments your soil needs. If you’ve done a soil test and it shows the soil is low in magnesium now is the time to add it. Peppers require more magnesium than most garden plants.

Hot and sweet peppers are grown the same way. Peppers appreciate a little crowding. I plant mine only 18-24 inches apart.

Have you seen a tip suggesting you spray your pepper plants with Epsom salt? It does help if your plants are pale green or yellowish and lacking blossoms!  Mix one teaspoon of Epsom salt with one quart of warm water. Mix until the salt completely dissolves and allow time for the water to cool to room temperature. Mist the plants with the water and stand back to watch. Within a few days you’ll see the leaves darken to a nice shade of green and blossoms should start to form.

Some varieties of peppers can grow to four feet tall. If necessary, you can stake pepper plants to keep them from falling over. You can also cage them to keep branches heavy with peppers from snapping. If you give them too much nitrogen the plants will become tall and thin and won’t produce well.

Although peppers don’t like cold soil when it’s time to germinate they are a little hardier than expected in the fall. Protect the plants from early frost.

Also see Tomatoes and Cucumbers.

What to Grow in the Garden – Tomatoes

It’s time to plan what to grow in the garden. Yes, yes…it’s only January, but it’s time. A mug of something hot to drink, paper and pencil to sketch the garden plan, day dreaming of warm weather, your hands in the soil and fresh food and flowers – it’s a great way to spend a winter day.

What should you grow in the garden? How much of each plant do you need? Where should it be planted? There’s a lot to consider but we’ll break it down into small items and make it easier.

What should you grow? What do you like to eat?

We’re going to start this series with tomatoes. We’ll talk about peppers, broccoli, cabbage, cauliflower, cumbers, pumpkins, squash and root crops, too. If there’s a vegetable you’d like to read about soon please let us know and we’ll bump it to the top of the list.

beefsteak tomato, beef steak tomato, how to grow tomatoesTomatoes are the all-time favorite. There’s nothing like a vine-ripened tomato, still cool early in the morning, full of natural sugar and juice, fresh from the garden.

  • Cherry – prolific producers of tiny tomatoes. Cherry tomatoes are the candy of tomatoes. You can pick them and pop them into your mouth without having to slice them or worry about dripping juice and seeds on your shirt. One to two plants per person will be enough to provide you with fresh cherries to eat in the garden and plenty to bring into the house for salad and snacking.
  • Slicing – thick slices of tomato on a BLT or cheeseburger come from slicing varieties. One or two plants per person should provide enough fresh tomatoes for the house and more to share with friends in a good year. In an iffy year with cool weather or too much rain, that should be enough for the household.
  • Paste tomatoes – the varieties used for sauce, paste and stewed tomatoes. This one is a little trickier to decide. Production between varieties can vary a lot, the thickness of your sauce and stewed tomatoes is a personal choice, and how often you’ll want to use a pint or quarter is subject to your menu. The best thing about these tomatoes is that if you put up more than you use in a year they store well. Four plants per person is a conservative number. If you don’t have enough paste tomatoes you can substitute with cherry and slicing tomatoes but will need more of those per quart of end product because they aren’t as meaty and have more juice.

Tomato plants can be as short as three feet tall and strong enough to support themselves to more than 20 feet long, clipped to twine and sprawling over support. Choose your varieties based on how big the plants will be at maturity and how much space you have for them.

cherry tomato

Juliet tomato

Most varieties need support. It can be as simple as a tomato cage or as involved as a solid frame. Twine strung from the frame can be used to clip the vines to. This method is labor intensive as it requires clipping and pruning several times a week but it produces large amounts of fruit.

Determinate varieties of stop growing at their full height and ripen most of their fruits in a short time. They’re best for limited space and short growing seasons. If you want a lot of paste tomatoes at once for canning, chose a determinate variety.

Indeterminate varieties of tomatoes continue to grow. They continue to produce fruit as they grow. They’re harder to control and require more pruning but if you have a long growing season and the space for them they’re a great way to go.

Deep watering once or twice a week is much better for tomatoes than frequent, shallow watering. Roots will grow deeply into the soil, pulling up nutrients and giving large plants a strong base. Adequate watering helps prevent blossom end rot (BER). Roots pull calcium into the rest of the plant as they bring in water. Shallow watering can causes problems when you get large amounts of rain. The tomatoes won’t be used to a lot of water, will grow too fast and the skins will crack.

Next week we’ll talk about cool weather crops.

See also: Peppers and Cucumbers

Homestead Planning – Will you want a garden?

Homestead Planning – Will you want a garden?

Gardening seems like a given on a homestead, but it isn’t. Not everyone likes to garden, or knows how to garden. None of us were born with everything we need to know about growing food. Don’t let that stop you!

If you’re starting from scratch I suggest you call your county’s Cooperative Extension and ask to speak to a Master Gardener. The local garden club and neighbors are also helpful. In the meantime, here are some things to think about when you’re considering a garden.

First things first. Be sure you are allowed to have a garden. As silly as that sounds, some home owners associations and subdivisions don’t allow vegetable gardening. Or, they might limit the garden to the back yard behind a fence. It’s considerate to ask a neighbor about their preferences to how close you garden to the shared property line. It’s possible that your town has a zoning law regarding how close you are allowed to be to the property line and sidewalk.

butternut squash, planning a garden, garden planning, gardening, homesteading

Butternut Squash

Is there room for a garden? You might be surprised at how little space it takes to grow a respectful amount of food. One tomato plant in a five gallon bucket may produce upwards of 20 pounds of tomatoes. That’s about $60 worth of tomatoes in exchange for a few dollars in the plant and soil. You can reuse the bucket from year to year. From container gardens to lining the sidewalk with vegetables to a full acre out back, you have options.

Are there large trees or buildings casting shade on the spot you’d have to use for a garden? The trees can probably be felled but moving a building probably won’t happen. You can use some shade to your advantage but there’s only so much you can do.

Is the garden spot convenient? We like to think we’ll be so excited about the garden that we’ll be there with bells on no matter where it is but let’s be honest – that’s not usually true. When it’s inconvenient we probably won’t make the time to walk the extra distance (let’s say a few hundred yards) to pull weeds for ten minutes. I don’t want to walk a few hundred yards for a cucumber.

How about water? Is it available? And convenient? You can run a hose just about anywhere if you have an outside faucet. The hose has to be moved out of the way to mow the lawn. It’s really not a big deal until it’s 90 degrees and you’ve had a long day.

Will you need to fence in the garden to keep out the pests? Deer and other large animals can do a lot of damage in a few minutes. Groundhogs and rabbits dig under fencing, deer jump over, squirrels squeeze through. If you’re going to need fencing I suggest having it ready to go sooner than later. You don’t want to lose your hard work to marauding bunnies over night.

Don’t be discouraged. Plan for the problem so it doesn’t become a problem! The taste of a warm, juicy, really ripe tomato from your garden makes it all worth it.

How to Plant Garlic

How to Plant Garlic

In Planning Ahead to Plant Garlic we wrote about preparing the soil before it was time to plant garlic. The time has come. Here’s how to plant garlic! It’s a little consuming but it’s not at all difficult. You’ll need part of a day when it hasn’t been raining. You want the soil to be moist but not wet. Garlic needs time to settle into the soil and establish roots but not so much time that it can sprout before the soil freezes.

You’ll need:

  • Garlic
  • Dibble or dowel
  • Straw
  • Compost or fertilizer

[subscribe2]

Sort through your garlic bulbs ahead of time. Separate the bulbs into cloves, discarding any that are spoiled or too small. Starting with large, healthy bulbs will get your future garlic harvest off to a good start.

how to plant garlic

Discard cloves that are too small or diseased

Amend the soil. Garlic is a heavy feeder. Add a two to three inch layer of compost to the soil and work it in. Or, add three pounds of 10-10-10 fertilizer to a 100 square foot area to the soil and work it in.

Mark two inches on the dibble or dowel to eliminate the guessimating. If you’re like me you’ll carefully poke the dibble in the recommended one to two inches at first, then you’ll realize how long it’s taking and just start poking. “Close enough” ends up too deep. As long as my dibble is marked I’m good to go.

Poke one to two inch deep holes in the amended soil, three to five inches apart. Rows should be 12″ to 18″ apart.

The pointed end of the clove is the top. The flat end is the root end. Drop one clove in each hole. I’ve found it faster to poke all of the holes I can reach at once, plant the cloves, then cover the hole than it is to do each one step by step by step. Do whatever works best for you, the garlic doesn’t care as long as it lands right side up.

How to plant garlic cloves

Garlic cloves

Cover the holes and water the soil deeply. This is the first and last time you’re going to water the soil this year so be generous with the water.

Spread a six inch layer of straw over the rows. The straw helps to insulate the soil and prevent heaving caused by frost. I mulch the space in between rows as heavily as I do the actual row. Garlic doesn’t like competition from weeds. If there’s going to be high wind or it’s not going to rain within a day or two I water the straw to weight it down and hold it in place. A slow spray will allow the water to soak in without running off.

If you can’t find straw you can use hay. Hay might add a few seeds to the soil but it will prevent more seeds from germinating so it’s worth the trade off. I tried mulching with leaves one year. It seemed fine in the fall but the cloves had a hard time breaking through the matted leaves in the spring. I had to pull them back to free the bulbs.

And now you wait. You shouldn’t have to do anything with your garlic until spring.